Disabling SSH Access in Azure Kubernetes Service (AKS) is now available for better security!
Azure Kubernetes Service (AKS) now supports disabling SSH access to enhance cluster security. This feature allows you to prevent SSH connections to your cluster nodes, reducing potential attack vectors and improving your overall security posture.
Prerequisites
⚠️ Important: You must upgrade your Azure CLI and install the AKS preview extension to use this feature.
Before proceeding with the commands below, ensure you have the latest Azure CLI version and the AKS preview extension installed:
# Update Azure CLI to the latest version
az upgrade

# Install or update the AKS preview extension
az extension add --name aks-preview
az extension update --name aks-preview
Managing SSH Access in AKS
Updating an Existing AKS Cluster
To disable SSH access on an existing AKS cluster, use the following command:
az aks update --name MyCluster --resource-group MyResourceGroup --ssh-access disabled
This command updates the AKS cluster called 'MyCluster' and disables SSH access to all nodes in the cluster.
Adding a New Node Pool with SSH Disabled
When adding a new node pool to your cluster, you can disable SSH access from the start:
az aks nodepool add --cluster-name MyCluster --resource-group MyResourceGroup --name MyNodePool --ssh-access disabled
This adds a new node pool named 'MyNodePool' to the 'MyCluster' cluster with SSH access disabled by default.
Updating an Existing Node Pool
If you have an existing node pool and want to disable SSH access, use this command:
az aks nodepool update --cluster-name MyCluster --resource-group MyResourceGroup --name MyNodePool --ssh-access disabled
This updates the specified node pool to disable SSH access to its nodes.
Security Benefits
Disabling SSH access provides several security advantages:
- Reduced Attack Surface: Eliminates SSH as a potential entry point for attackers
- Improved Compliance: Helps meet security requirements that prohibit direct node access
- Simplified Security Management: Reduces the need to manage SSH keys and access controls
Alternative Access Methods
Even with SSH disabled, you can still access nodes for troubleshooting purposes using Kubernetes debug containers:
# Create a debug container on a specific node
kubectl debug node/NODE_NAME -it --image=mcr.microsoft.com/dotnet/runtime-deps:6.0

# Once inside the debug container, you can access the host filesystem
chroot /host
This method allows you to:
- Access the node's filesystem and processes
- Run diagnostic commands
- Troubleshoot node-level issues
- Perform maintenance tasks when necessary
Important Considerations
- Once SSH access is disabled, you will not be able to directly connect to the cluster nodes via SSH
- Debug containers with
chroot /hostprovide an alternative way to access node internals when needed - Use alternative methods like
kubectl debugor Azure Container Instances for troubleshooting - Ensure your monitoring and logging solutions are properly configured before disabling SSH access
- This feature requires the AKS preview extension and may not be available in all Azure regions initially
Next Steps
After disabling SSH access, consider implementing additional security measures such as:
- Enabling Azure Policy for Kubernetes
- Configuring network policies
- Implementing proper RBAC controls
- Setting up comprehensive monitoring and alerting
Remember to test these changes in a development environment before applying them to production clusters.

Secure HTTP Traffic with HashiCorp Vault as your PKI + Cert Manager in Kubernetes - Deep Dive!
Here's a deep dive technical guide with the steps to configure HashiCorp Vault as a Private Certificate Authority (PKI) and integrate it with cert-manager in Kubernetes to automate certificate management. I've configured it in production environments but for the purposes of this demo I am implementing it in my lab so that my internal apps can have HTTPS encryption in transit. Here are a few examples of internal apps with certs and as you can see the ping shows they are in a private network.


Main Benefits:
- Centralized PKI Infrastructure: Vault provides a centralized solution for managing your entire certificate lifecycle. Instead of managing certificates across different applications and services, Vault acts as a single source of truth for all your PKI needs. This centralization simplifies management, improves security posture, and ensures consistent certificate policies across your organization.
- Dynamic Certificate Issuance and Rotation: Vault can automatically issue short-lived certificates and rotate them before expiration. When integrated with cert-manager in Kubernetes, this automation eliminates the manual certificate renewal process that often leads to outages from expired certificates. The system can continuously issue, renew, and rotate certificates without human intervention.
- Fine-grained Access Control: Vault's advanced policy system allows you to implement precise access controls around who can issue what types of certificates. You can limit which teams or services can request certificates for specific domains, restrict certificate lifetimes based on risk profiles, and implement comprehensive audit logging. This helps enforce the principle of least privilege across your certificate infrastructure.
An additional benefit is Vault's broader secret management capabilities – the same tool managing your certificates can also handle database credentials, API keys, and other sensitive information, giving you a unified approach to secrets management.
Prerequisites
- A DNS Server (I use my firewall)
- A running Kubernetes cluster (I am using microk8s)
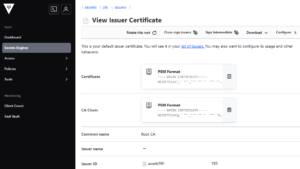
- Vault server installed and initialized (vault 0.30.0 · hashicorp/hashicorp)
- cert-manager installed in your Kubernetes cluster (microk8s addon)
- Administrative access to both Vault and Kubernetes
See my homelab diagram in github: mdf-ido/mdf-ido: Config files for my GitHub profile.
1. Configure Vault as a PKI
1.1. Enable the PKI Secrets Engine
# Enable the PKI secrets engine
vault secrets enable pki
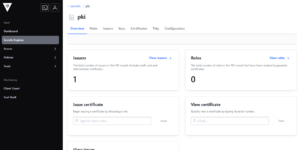
# Configure the PKI secrets engine with a longer max lease time (e.g., 1 year)
vault secrets tune -max-lease-ttl=8760h pki
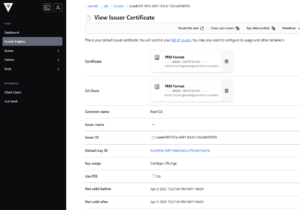
1.2. Generate or Import Root CA
# Generate a new root CA
vault write -field=certificate pki/root/generate/internal \
    common_name="Root CA" \
    ttl=87600h > root_ca.crt
1.3. Configure PKI URLs
# Configure the CA and CRL URLs
vault write pki/config/urls \
    issuing_certificates="http://vault.example.com:8200/v1/pki/ca" \
    crl_distribution_points="http://vault.example.com:8200/v1/pki/crl"

1.4. Create an Intermediate CA
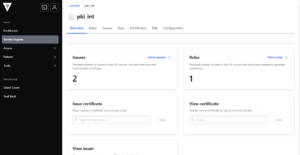
# Enable the intermediate PKI secrets engine
vault secrets enable -path=pki_int pki

# Set the maximum TTL for the intermediate CA
vault secrets tune -max-lease-ttl=43800h pki_int

# Generate a CSR for the intermediate CA
vault write -format=json pki_int/intermediate/generate/internal \
    common_name="Intermediate CA" \
    ttl=43800h > pki_intermediate.json

# Extract the CSR
cat pki_intermediate.json | jq -r '.data.csr' > pki_intermediate.csr

# Sign the intermediate CSR with the root CA
vault write -format=json pki/root/sign-intermediate \
    csr=@pki_intermediate.csr \
    format=pem_bundle \
    ttl=43800h > intermediate_cert.json

# Extract the signed certificate
cat intermediate_cert.json | jq -r '.data.certificate' > intermediate.cert.pem

# Import the signed certificate back into Vault
vault write pki_int/intermediate/set-signed \
    certificate=@intermediate.cert.pem
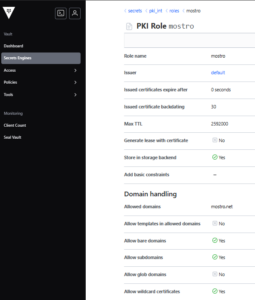
1.5. Create a Role for Certificate Issuance
# Create a role for issuing certificates
vault write pki_int/roles/your-domain-role \
    allowed_domains="yourdomain.com" \
    allow_subdomains=true \
    allow_bare_domains=true \
    allow_wildcard_certificates=true \
    max_ttl=720h
2. Configure Kubernetes Authentication in Vault
2.1. Enable Kubernetes Auth Method
# Enable the Kubernetes auth method
vault auth enable kubernetes
2.2. Configure Kubernetes Auth Method
# Get the Kubernetes API address
KUBE_API="https://kubernetes.default.svc.cluster.local"

# Get the CA certificate used by Kubernetes
KUBE_CA_CERT=$(kubectl config view --raw --minify --flatten --output='jsonpath={.clusters[].cluster.certificate-authority-data}' | base64 --decode)

# Get the JWT token for the Vault SA
KUBE_TOKEN=$(kubectl create token vault-auth)

# Configure the Kubernetes auth method in Vault
vault write auth/kubernetes/config \
    kubernetes_host="$KUBE_API" \
    kubernetes_ca_cert="$KUBE_CA_CERT" \
    token_reviewer_jwt="$KUBE_TOKEN" \
    issuer="https://kubernetes.default.svc.cluster.local"

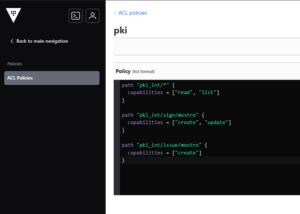
2.3. Create Policy for Certificate Issuance
# Create a policy file
cat > pki-policy.hcl << EOF
# Read and list access to PKI endpoints
path "pki_int/*" {
  capabilities = ["read", "list"]
}

# Allow creating certificates
path "pki_int/sign/your-domain-role" {
  capabilities = ["create", "update"]
}

path "pki_int/issue/your-domain-role" {
  capabilities = ["create"]
}
EOF

# Create the policy in Vault
vault policy write pki-policy pki-policy.hcl
2.4. Create Kubernetes Auth Role
# Create a role that maps a Kubernetes service account to Vault policies (Created next)
vault write auth/kubernetes/role/cert-manager \
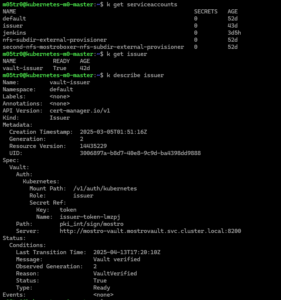
bound_service_account_names="issuer" \
bound_service_account_namespaces="default" \
policies="pki-policy" \
ttl=1h
3. Configure cert-manager to Use Vault
3.1. Create Service Account for cert-manager
# Create a file named cert-manager-vault-sa.yaml
apiVersion: v1
kind: ServiceAccount
metadata:
  name: issuer
  namespace: default
Apply the manifest:
kubectl apply -f cert-manager-vault-sa.yaml
3.2. Create Issuer Resource
# Create a file named vault-issuer.yaml
apiVersion: cert-manager.io/v1
kind: Issuer
metadata:
  name: vault-issuer
  namespace: default
spec:
  vault:
    server: http://vault.vault-system.svc.cluster.local:8200
    path: pki_int/sign/your-domain-role
    auth:
      kubernetes:
        mountPath: /v1/auth/kubernetes
        role: cert-manager
        serviceAccountRef:
          name: issuer
Apply the manifest:
kubectl apply -f vault-issuer.yaml
4. Request Certificates
4.1. Direct Certificate Request
# Create a file named certificate.yaml
apiVersion: cert-manager.io/v1
kind: Certificate
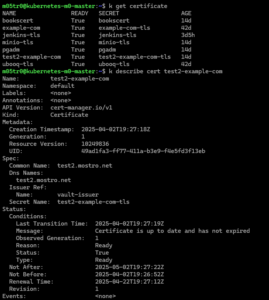
metadata:
name: example-cert
namespace: default
spec:
secretName: example-tls
issuerRef:
name: vault-issuer
commonName: app.yourdomain.com
dnsNames:
- app.yourdomain.com
Apply the manifest:
kubectl apply -f certificate.yaml
4.2. Using Ingress for Certificate Request
# Create a file named secure-ingress.yaml
apiVersion: networking.k8s.io/v1
kind: Ingress
metadata:
  name: secure-ingress
  annotations:
    cert-manager.io/issuer: "vault-issuer"
spec:
  tls:
  - hosts:
    - app.yourdomain.com
    secretName: example-tls
  rules:
  - host: app.yourdomain.com
    http:
      paths:
      - path: /
        pathType: Prefix
        backend:
          service:
            name: example-app
            port:
              number: 80
Apply the manifest:
kubectl apply -f secure-ingress.yaml
5. Troubleshooting
5.1. Common Issues and Solutions
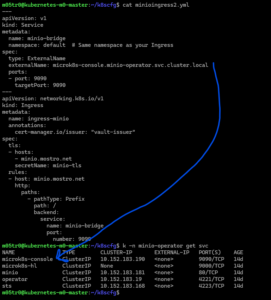
Cannot find cert issuer
The cert issuer was deployed to a specific namespace so if you are creating an ingress outside you might need to solve with a few things:
- Create a cluster issuer which is not restricted to a namespace
- Create a duplicate issuer in the specific namespace
- Create an externalName service and bridge the actual service.
Permission Denied
If you see permission denied errors:
- Check that your Vault policy includes the correct paths
- Verify that the role binding is correct in Vault
- Ensure the service account has the necessary permissions
# Check the Vault policy
vault policy read pki-policy

# Verify the role binding
vault read auth/kubernetes/role/cert-manager
Domain Not Allowed
If you see common name not allowed by this role errors:
- Update your Vault PKI role to allow the domain:
vault write pki_int/roles/your-domain-role \
    allowed_domains="yourdomain.com" \
    allow_subdomains=true \
    allow_bare_domains=true \
    allow_wildcard_certificates=true
Certificate Expiry Issues
If your certificate would expire after the CA certificate:
- Adjust the max TTL to be shorter than your CA expiration:
vault write pki_int/roles/your-domain-role \
    max_ttl="30d"
Issuer Annotation Issues
If multiple controllers are fighting for the certificate request:
- Check that you're using the correct annotation:
- For namespaced Issuers:
cert-manager.io/issuer - For ClusterIssuers:
cert-manager.io/cluster-issuer
- For namespaced Issuers:
5.2. Checking Certificate Status
# Check certificate status
kubectl describe certificate example-cert

# Check certificate request status
kubectl get certificaterequest

# Check cert-manager logs
kubectl logs -n cert-manager deploy/cert-manager-controller

# Check if the secret was created
kubectl get secret example-tls
6. Best Practices
- Certificate Rotation: Set appropriate TTLs and let cert-manager handle rotation
- Secure Vault Access: Restrict access to Vault and use dedicated service accounts
- Monitor Expirations: Set up alerts for certificate expirations
- CA Renewals: Plan for CA certificate renewals well in advance
- Backup: Regularly backup your Vault PKI configuration and CA certificates
- Audit Logging: Enable audit logging in Vault to track certificate operations
7. Maintenance and Operations
7.1. Renewing the CA Certificate
Before your CA certificate expires, you'll need to renew it:
# Check when your CA certificate expires
vault read pki_int/cert/ca

# Plan and execute your CA renewal process well before expiration
7.2. Rotating Credentials
Periodically rotate your Kubernetes auth credentials:
# Update the JWT token used by Vault
KUBE_TOKEN=$(kubectl create token vault-auth)
vault write auth/kubernetes/config \
    token_reviewer_jwt="$KUBE_TOKEN"
Issues
- Your ingresses need to be in the same namespace as the issuer
- Create an external service as bridge
- You now have a fully functional PKI system using HashiCorp Vault integrated with cert-manager in Kubernetes. This setup automatically issues, manages, and renews TLS certificates for your applications, enhancing security and reducing operational overhead.
Conclusion
You now have a fully functional PKI system using HashiCorp Vault integrated with cert-manager in Kubernetes. This setup automatically issues, manages, and renews TLS certificates for your applications, enhancing security and reducing operational overhead.
Deploying Azure Functions in Containers to Azure Container Apps - like a boss!!!
Introduction
In today's cloud-native world, containerization has become a fundamental approach for deploying applications. Azure Functions can be containerized and deployed to a docker container which means we can deploy them on kubernetes. One compelling option is Azure Container Apps (ACA), which provides a fully managed Kubernetes-based environment with powerful features specifically designed for microservices and containerized applications.
Azure Container Apps is powered by Kubernetes and open-source technologies like Dapr, KEDA, and Envoy. It supports Kubernetes-style apps and microservices with features like service discovery and traffic splitting while enabling event-driven application architectures. This makes it an excellent choice for deploying containerized Azure Functions.
This blog post explores how to deploy Azure Functions in containers to Azure Container Apps, with special focus on the benefits of Envoy for traffic management, revision handling, and logging capabilities for troubleshooting.
Video Demo:
Why Deploy Azure Functions to Container Apps?
Container Apps hosting lets you run your functions in a fully managed, Kubernetes-based environment with built-in support for open-source monitoring, mTLS, Dapr, and Kubernetes Event-driven Autoscaling (KEDA). You can write your function code in any language stack supported by Functions and use the same Functions triggers and bindings with event-driven scaling.
Key advantages include:
- Containerization flexibility: Package your functions with custom dependencies and runtime environments for Dev, QA, STG and PROD
- Kubernetes-based infrastructure: Get the benefits of Kubernetes without managing the complexity
- Microservices architecture support: Deploy functions as part of a larger microservices ecosystem
- Advanced networking: Take advantage of virtual network integration and service discovery
Benefits of Envoy in Azure Container Apps
Azure Container Apps includes a built-in Ingress controller running Envoy. You can use this to expose your application to the outside world and automatically get a URL and an SSL certificate. Envoy brings several significant benefits to your containerized Azure Functions:
1. Advanced Traffic Management
Envoy serves as the backbone of ACA's traffic management capabilities, allowing for:
- Intelligent routing: Route traffic based on paths, headers, and other request attributes
- Load balancing: Distribute traffic efficiently across multiple instances
- Protocol support: Downstream connections support HTTP1.1 and HTTP2, and Envoy automatically detects and upgrades connections if the client connection requires an upgrade.
2. Built-in Security
- TLS termination: Automatic handling of HTTPS traffic with Azure managed certificates
- mTLS support: Azure Container Apps supports peer-to-peer TLS encryption within the environment. Enabling this feature encrypts all network traffic within the environment with a private certificate that is valid within the Azure Container Apps environment scope. Azure Container Apps automatically manage these certificates.
3. Observability
- Detailed metrics and logs for traffic patterns
- Request tracing capabilities
- Performance insights for troubleshooting
Traffic Management for Revisions
One of the most powerful features of Azure Container Apps is its handling of revisions and traffic management between them.
Understanding Revisions
Revisions are immutable snapshots of your container application at a point in time. When you upgrade your container app to a new version, you create a new revision. This allows you to have the old and new versions running simultaneously and use the traffic management functionality to direct traffic to old or new versions of the application.
Traffic Splitting Between Revisions
Traffic split is a mechanism that routes configurable percentages of incoming requests (traffic) to various downstream services. With Azure Container Apps, we can weight traffic between multiple downstream revisions.
This capability enables several powerful deployment strategies:
Blue/Green Deployments
Deploy a new version alongside the existing one, and gradually shift traffic:
- Deploy revision 2 (green) alongside revision 1 (blue)
- Initially direct a small percentage (e.g., 10%) of traffic to revision 2
- Monitor performance and errors
- Gradually increase traffic to revision 2 as confidence grows
- Eventually direct 100% traffic to revision 2
- Retire revision 1 when no longer needed
A/B Testing
Test different implementations with real users:
Traffic splitting is useful for testing updates to your container app. You can use traffic splitting to gradually phase in a new revision in blue-green deployments or in A/B testing. Traffic splitting is based on the weight (percentage) of traffic that is routed to each revision.
Implementation
To implement traffic splitting in Azure Container Apps:
By default, when ingress is enabled, all traffic is routed to the latest deployed revision. When you enable multiple revision mode in your container app, you can split incoming traffic between active revisions.
Here's how to configure it:
- Enable multiple revision mode:
- In the Azure portal, go to your container app
- Select "Revision management"
- Set the mode to "Multiple: Several revisions active simultaneously"
- Apply changes
- Configure traffic weights:
- For each active revision, specify the percentage of traffic it should receive
- Ensure the combined percentage equals 100%
Logging and Troubleshooting
Effective logging is crucial for monitoring and troubleshooting containerized applications. Azure Container Apps provides comprehensive logging capabilities integrated with Azure Monitor.
Centralized Logging Infrastructure
Azure Container Apps environments provide centralized logging capabilities through integration with Azure Monitor and Application Insights. By default, all container apps within an environment send logs to a common Log Analytics workspace, making it easier to query and analyze logs across multiple apps.
Key Logging Benefits
- Unified logging experience: All container apps in an environment send logs to the same workspace
- Detailed container insights: Access container-specific metrics and logs
- Function-specific logging: You can monitor your containerized function app hosted in Container Apps using Azure Monitor Application Insights in the same way you do with apps hosted by Azure Functions.
- Scale event logging: For bindings that support event-driven scaling, scale events are logged as FunctionsScalerInfo and FunctionsScalerError events in your Log Analytics workspace.
Troubleshooting Best Practices
When troubleshooting issues in containerized Azure Functions running on ACA:
- Check application logs: Review function execution logs for errors or exceptions
- Monitor scale events: Identify issues with auto-scaling behavior
- Examine container health: Check for container startup failures or crashes
- Review ingress traffic: Analyze traffic patterns and routing decisions
- Inspect revisions: Verify that traffic is being distributed as expected between revisions
Implementation Steps
Here's the full playlist we did in youtube to follow along: https://www.youtube.com/playlist?list=PLKwr1he0x0Dl2glbE8oHeTgdY-_wZkrhi
In Summary:
- Containerize your Azure Functions app:
- Create a Dockerfile based on the Azure Functions base images
- Build and test your container locally
- Video demo:
- Push your container to a registry:
- Push to Azure Container Registry or another compatible registry
- Create a Container Apps environment:
- Set up the environment with appropriate virtual network and logging settings
- Deploy your function container:
- Use Azure CLI, ARM templates, or the Azure Portal to deploy
- Configure scaling rules, ingress settings, and revision strategy
- Set up traffic management:
- Enable multiple revision mode if desired
- Configure traffic splitting rules for testing or gradual rollout
Conclusion
Deploying Azure Functions in containers to Azure Container Apps combines the best of serverless computing with the flexibility of containers and the rich features of a managed Kubernetes environment. The built-in Envoy proxy provides powerful traffic management capabilities, especially for handling multiple revisions of your application. Meanwhile, the integrated logging infrastructure simplifies monitoring and troubleshooting across all your containerized functions.
This approach is particularly valuable for teams looking to:
- Deploy Azure Functions with custom dependencies
- Integrate functions into a microservices architecture
- Implement sophisticated deployment strategies like blue/green or A/B testing
- Maintain a consistent container-based deployment strategy across all application components
By leveraging these capabilities, you can create more robust, scalable, and manageable serverless applications while maintaining the development simplicity that makes Azure Functions so powerful.

Why is the app not starting? - Understanding the .NET Stack on Windows
One of the key elements to understand, as an IT professional (Mostly working with Windows) that's transitioning to DevOps or Platform Engineering, is everything that surrounds code. If you maintain servers for applications, you've likely encountered scenarios where a seemingly straightforward application fails to deploy or fails after deployment. Perhaps they've copied all the files to the right locations, but the application refuses to run. Or maybe it works on one server but not another, even though they appear identical at first glance.
The root of these problems, aside from networking and having the correct ports opened to different services if you are in an air-gapped environment, often lies in an incomplete understanding of the application stack – the complete set of software components required for an application to run properly. In this article, we'll explain application stacks fundamentals, focusing on Windows server environments and .NET applications as an example. I'll explain how the various layers interact and how to ensure your servers are properly configured before deploying code.
What Is an Application Stack?
An application stack is like a layer cake. Each layer provides essential functionality that the layers above it depend on. If any layer is missing or misconfigured, the entire application may fail to run correctly – or at all.
Consider a typical .NET web application. From bottom to top, its stack might include:
- The operating system (Windows Server)
- Required Windows features (IIS, necessary Windows components)
- Runtime environments (.NET Framework or .NET Core)
- Middleware components (ASP.NET, Entity Framework)
- The application code itself
Let's break down each of these components to understand their role in the stack.
The Foundation: Operating System and Windows Features
At the base of our application stack is the operating system. For .NET applications, this is typically a Windows Server environment. However, simply having Windows Server with runtimes installed isn't enough – you also need IIS from Windows features.
Internet Information Services (IIS)
IIS is Microsoft's web server software that handles HTTP requests and responses. For web applications, IIS is essential, but it's not a monolithic feature. IIS comprises multiple components and features, each serving a specific purpose, examples below.
- Web Server (IIS) – The core feature that enables the server to respond to HTTP requests
- IIS Management Console – The GUI tool for configuring IIS
- Basic Authentication – For simple username/password authentication
- Windows Authentication – For integrated Windows authentication
- URL Rewrite Module – For manipulating requested URLs based on defined rules
Think of IIS features as specialized tools in a toolbox. Installing all IIS features on every server would be like carrying the entire toolbox to every job when you only need a screwdriver. Understanding which features your application requires is critical for proper configuration and security.
Picking, ONLY, the necessary features is also essential for good security. We often see admins that enable all features in IIS and move on.
How Missing IIS Features or too many features Cause Problems
Imagine deploying a web application that uses Windows Authentication. If the Windows Authentication feature isn't installed on IIS, users will receive authentication errors even though the application code is perfectly valid. These issues can be perplexing because they're not caused by bugs in the code but by missing infrastructure components.
The Engines: Runtime Environments
Runtimes are the engines that execute your application code. They provide the necessary libraries and services for your application to run. In the .NET ecosystem, the most common runtimes are:
.NET Framework Runtime
The traditional .NET Framework is Windows-only and includes:
- CLR (Common Language Runtime) – Executes the compiled code
- Base Class Library – Provides fundamental types and functionality
Applications targeting specific versions of .NET Framework (e.g., 4.6.2, 4.7.2, 4.8) require that exact version installed on the server.
.NET Core/.NET Runtime
The newer, cross-platform .NET implementation includes:
- .NET Runtime – The basic runtime for console applications
- ASP.NET Core Runtime – Additional components for web applications
- .NET Desktop Runtime – Components for Windows desktop applications
- Web Hosting Bundle – Combines the ASP.NET Core Runtime with the IIS integration module
Why Runtimes Matter
Runtimes are version-specific. An application built for .NET Core 3.1 won't run on a server with only .NET 5 installed, even though .NET 5 is newer. This version specificity is a common source of deployment issues.
Consider this real-world scenario: A development team builds an application using .NET Core 3.1. The production server has .NET 5 installed. When deployed, the application fails with cryptic errors about missing assemblies. The solution isn't to fix the code but to install the correct runtime on the server.
The Bridges: Middleware and Frameworks
Between the runtime and your application code lies middleware – components that provide additional functionality beyond what the basic runtime offers. In .NET applications, this often includes:
- ASP.NET (for .NET Framework) or ASP.NET Core (for .NET Core/.NET) – For web applications
- Entity Framework – For database access
- SignalR – For real-time communications
Middleware components can have their own dependencies and version requirements. For example, an application using Entity Framework Core 3.1 needs compatible versions of other components.
The Pinnacle: Application Code
At the top of the stack sits your application code – the custom software that provides the specific functionality your users need. This includes:
- Compiled assemblies (.dll files)
- Configuration files
- Static content (HTML, CSS, JavaScript, images)
- Client-side libraries
While this is the most visible part of the stack, it cannot function without all the layers beneath it.
Bringing It All Together: A Practical Example
Let's examine a concrete example to illustrate how all these components interact:
Scenario: Deploying a .NET Core 3.1 MVC web application that uses Windows Authentication and connects to a SQL Server database.
Required stack components:
- Operating System: Windows Server 2019
- Windows Features:
- IIS Web Server
- Windows Authentication
- ASP.NET 4.8 (for backward compatibility with some components)
- Runtimes:
- .NET Core 3.1 SDK (for development servers)
- .NET Core 3.1 ASP.NET Core Runtime (for production servers)
- .NET Core 3.1 Hosting Bundle (which installs the ASP.NET Core Module for IIS)
- Middleware:
- Entity Framework Core 3.1
- Application Code:
- Your custom application DLLs
- Configuration files (appsettings.json)
- Static web content
If any component is missing from this stack, the application won't function correctly. For instance:
- Without the Windows Authentication feature, users can't log in.
- Without the .NET Core 3.1 Runtime, the application won't start.
- Without the ASP.NET Core Module, IIS won't know how to handle requests for the application.
Best Practices for Managing Application Stacks
Now that we understand what makes up an application stack, let's look at some best practices for managing them:
1. Document Your Application Stack
Create detailed documentation of every component required for your application, including specific versions. This documentation should be maintained alongside your codebase and updated whenever dependencies change.
2. CICD and Server Setup Scripts
Automate the installation and configuration of your application stack using PowerShell scripts or configuration management tools. This ensures consistency across environments and makes it easier to set up new servers.
# Example PowerShell script to install required IIS components for a .NET Core application
# Enable IIS and required features

$features = @(
    'Web-Default-Doc',
    'Web-Dir-Browsing',
    'Web-Http-Errors',
    'Web-Static-Content',
    'Web-Http-Redirect',
    'Web-Http-Logging',
    'Web-Custom-Logging',
    'Web-Log-Libraries',
    'Web-ODBC-Logging',
    'Web-Request-Monitor',
    'Web-Http-Tracing',
    'Web-Stat-Compression',
    'Web-Dyn-Compression',
    'Web-Filtering',
    'Web-Basic-Auth',
    'Web-CertProvider',
    'Web-Client-Auth',
    'Web-Digest-Auth',
    'Web-Cert-Auth',
    'Web-IP-Security',
    'Web-Url-Auth',
    'Web-Windows-Auth',
    'Web-Net-Ext',
    'Web-Net-Ext45',
    'Web-AppInit',
    'Web-Asp',
    'Web-Asp-Net',
    'Web-Asp-Net45',
    'Web-ISAPI-Ext',
    'Web-ISAPI-Filter',
    'Web-Mgmt-Console',
    'Web-Metabase',
    'Web-Lgcy-Mgmt-Console',
    'Web-Lgcy-Scripting',
    'Web-WMI',
    'Web-Scripting-Tools',
    'Web-Mgmt-Service'
)

foreach ($iissharefilereq in $features){
Install-WindowsFeature $iissharefilereq -Confirm:$false
}
 # Download and install .NET Core Hosting Bundle Invoke-WebRequest -Uri 'https://download.visualstudio.microsoft.com/download/pr/48d3bdeb-c0c0-457e-b570-bc2c65a4d51e/c81fc85c9319a573881b0f8b1f671f3a/dotnet-hosting-3.1.25-win.exe' -OutFile 'dotnet-hosting-3.1.25-win.exe' Start-Process -FilePath 'dotnet-hosting-3.1.25-win.exe' -ArgumentList '/quiet' -Wait # Restart IIS to apply changes net stop was /y net start w3svc
3. Use Configuration Verification
Implement scripts that verify server configurations before deployment. These scripts should check for all required components and their versions, alerting you to any discrepancies.
4. Consider Containerization
For more complex applications, consider containerization technologies like Docker. Containers package the application and its dependencies together, ensuring consistency across environments and eliminating many configuration issues.
5. Create Environment Parity
Ensure that your development, testing, and production environments have identical application stacks. This reduces the "it works on my machine" problem and makes testing more reliable.
6. Application Logging
Ensure that web.config has a logging directory to catch errors.
Common Pitfalls and How to Avoid Them
Several common pitfalls can trip up IT teams when managing application stacks:
Pitfall 1: Assuming Newer Is Always Better
Just because a newer version of a runtime or framework is available doesn't mean your application is compatible with it. Always test compatibility before upgrading components in your application stack.
Pitfall 2: Incomplete Feature Installation
When installing Windows features like IIS, it's easy to miss sub-features that your application requires. Use comprehensive installation scripts that include all necessary components.
Pitfall 3: Overlooking Dependencies
Some components have dependencies that aren't immediately obvious. For example, certain .NET features depend on specific Visual C++ Redistributable packages. Make sure to identify and install all dependencies.
Pitfall 4: Ignoring Regional and Language Settings
Applications may behave differently based on regional settings, time zones, or character encodings. Ensure these settings are consistent across your environments.
Pitfall 5: Misconfigured Permissions
Even with all the right components installed, incorrect permissions on IIS web folder level can prevent applications from running correctly. Ensure your application has the necessary permissions to access files, folders, and other resources. The app pool usually has IDs to authenticate.
Conclusion
Understanding application stacks is crucial for successful deployment and maintenance of modern applications. By recognizing that your application is more than just the code you write – it's a complex interplay of operating system features, runtimes, middleware, and your custom code – you can approach server configuration methodically and avoid mysterious deployment failures.
The next time you prepare to deploy an application, take the time to document and verify your application stack. Your future self (and your colleagues) will thank you when deployments go smoothly and applications run as expected in every environment.
Remember: Proper server configuration isn't an afterthought – it's a prerequisite for your application code to function correctly.
Azure Container Apps: Simplifying Container Deployment with Enterprise-Grade Features
In the ever-evolving landscape of cloud computing, organizations are constantly seeking solutions that balance simplicity with enterprise-grade capabilities. Azure Container Apps emerges as a compelling answer to this challenge, offering a powerful abstraction layer over container orchestration while providing the robustness needed for production workloads.
What Makes Azure Container Apps Special?
Azure Container Apps represents Microsoft’s vision for serverless container deployment. While Kubernetes has become the de facto standard for container orchestration, its complexity can be overwhelming for teams that simply want to deploy and scale their containerized applications. Container Apps provides a higher-level abstraction that handles many infrastructure concerns automatically, allowing developers to focus on their applications.
Key Benefits of the Platform
Built-in Load Balancing with Envoy
One of the standout features of Azure Container Apps is its integration with Envoy as a load balancer. This isn’t just any load balancer – Envoy is the same battle-tested proxy used by major cloud-native platforms. It provides:
- Automatic HTTP/2 and gRPC support
- Advanced traffic splitting capabilities for A/B testing
- Built-in circuit breaking and retry logic
- Detailed metrics and tracing
The best part? You don’t need to configure or maintain Envoy yourself. It’s managed entirely by the platform, giving you enterprise-grade load balancing capabilities without the operational overhead.
Integrated Observability with Azure Application Insights
Understanding what’s happening in your containerized applications is crucial for maintaining reliability. Container Apps integrates seamlessly with Azure Application Insights, providing:
- Distributed tracing across your microservices
- Detailed performance metrics and request logging
- Custom metric collection
- Real-time application map visualization
The platform automatically injects the necessary instrumentation, ensuring you have visibility into your applications from day one.
Cost Considerations and Optimization
While Azure Container Apps offers a serverless pricing model that can be cost-effective, it’s important to understand the pricing structure to avoid surprises:
Cost Components
- Compute Usage: Charged per vCPU-second and GB-second of memory used
- Baseline: ~$0.000012/vCPU-second
- Memory: ~$0.000002/GB-second
- Request Processing:
- First 2 million requests/month included
- ~$0.40 per additional million requests
- Storage and Networking:
- Ingress: Free
- Egress: Standard Azure bandwidth rates apply
Cost Optimization Tips
To keep your Azure Container Apps costs under control:
- Right-size your containers by carefully setting resource limits and requests
- Utilize scale-to-zero for non-critical workloads
- Configure appropriate minimum and maximum replica counts
- Monitor and adjust based on actual usage patterns
Advanced Features Worth Exploring
Revision Management
Container Apps introduces a powerful revision management system that allows you to:
- Maintain multiple versions of your application
- Implement blue-green deployments
- Roll back to previous versions if needed
DAPR Integration
For microservices architectures, the built-in DAPR (Distributed Application Runtime) support provides:
- Service-to-service invocation
- State management
- Pub/sub messaging
- Input and output bindings
Conclusion
Azure Container Apps strikes an impressive balance between simplicity and capability. It removes much of the complexity associated with container orchestration while providing the features needed for production-grade applications. Whether you’re building microservices, web applications, or background processing jobs, Container Apps offers a compelling platform that can grow with your needs.
By understanding the pricing model and following best practices for cost optimization, you can leverage this powerful platform while keeping expenses under control. The integration with Azure’s broader ecosystem, particularly Application Insights and Container Registry, creates a seamless experience for developing, deploying, and monitoring containerized applications.
Remember to adjust resource allocations and scaling rules based on your specific workload patterns to optimize both performance and cost. Monitor your application’s metrics through Application Insights to make informed decisions about resource utilization and scaling policies.

Comprehensive Guide to Upgrading Ansible via Pip with New Python Versions on Ubuntu 20.04
For system administrators and DevOps engineers using Ansible in production environments, upgrading Ansible can sometimes be challenging, especially when the new version requires a newer Python version than what's available by default in Ubuntu 20.04. This guide walks through the process of upgrading Ansible installed via pip when a new Python version is required.
Why This Matters
Ubuntu 20.04 LTS ships with Python 3.8 by default. However, newer Ansible versions may require Python 3.9, 3.10, or even newer. Since Ansible in our environment is installed via pip rather than the APT package manager, we need a careful approach to manage this transition without breaking existing automation.
Prerequisites
- Ubuntu 20.04 LTS system
- Sudo access
- Existing Ansible installation via pip
- Backup of your Ansible playbooks and configuration files
Step 1: Install the Python Repository "Snakes"
The "deadsnakes" PPA provides newer Python versions for Ubuntu. This repository allows us to install Python versions that aren't available in the standard Ubuntu repositories.
# Add the deadsnakes PPA
sudo add-apt-repository ppa:deadsnakes/ppa

# Update package lists
sudo apt update
Step 2: Install the New Python Version and Pip
Install the specific Python version required by your target Ansible version. In this example, we'll use Python 3.10, but adjust as needed.
# Install Python 3.10 and development headers
sudo apt install python3.10 python3.10-dev python3.10-venv

# Install pip for Python 3.10
curl -sS https://bootstrap.pypa.io/get-pip.py | sudo python3.10

# Verify the installation
python3.10 --version
python3.10 -m pip --version
Note: After this step, you will have different Python versions installed, and you will need to use them with the correct executable as shown above (e.g.,
python3.10for Python 3.10,python3.8for the default Ubuntu 20.04 Python).
Warning: Do not uninstall the Python version that comes with the OS (Python 3.8 in Ubuntu 20.04), as this can cause serious issues with the Ubuntu system. Many system utilities depend on this specific Python version.
Step 3: Uninstall Ansible from the Previous Python Version
Before installing the new version, remove the old Ansible installation to avoid conflicts.
# Find out which pip currently has Ansible installed
which ansible
# This will show something like /usr/local/bin/ansible or ~/.local/bin/ansible

# Check which Python version is used for the current Ansible
ansible --version
# Look for the "python version" line in the output

# Uninstall Ansible from the previous Python version
python3.8 -m pip uninstall ansible ansible-core

# If you had other Ansible-related packages, uninstall those too
python3.8 -m pip uninstall ansible-runner ansible-builder
Step 4: Install Ansible with the New Python Version
Install Ansible for both system-wide (sudo) and user-specific contexts as needed:
System-Wide Installation (sudo)
# Install Ansible system-wide with the new Python version
sudo python3.10 -m pip install ansible

# Verify the installation
ansible --version
# Confirm it shows the new Python version
User-Specific Installation (if needed)
# Install Ansible for your user with the new Python version
python3.10 -m pip install --user ansible

# Verify the installation
ansible --version
Reinstall Additional Pip Packages with the New Python Version
If you had additional pip packages installed for Ansible, reinstall them with the --force-reinstall flag to ensure they use the new Python version:
# Reinstall packages with the new Python version
sudo python3.10 -m pip install --force-reinstall ansible-runner ansible-builder

# For user-specific installations
python3.10 -m pip install --user --force-reinstall ansible-runner ansible-builder
Step 5: Update Ansible Collections
Ansible collections might need to be updated to work with the new Ansible version:
# List currently installed collections
ansible-galaxy collection list

# Update all collections
ansible-galaxy collection install --upgrade --force-with-deps <collection_name>

# Example:
# ansible-galaxy collection install --upgrade --force-with-deps community.general
# ansible-galaxy collection install --upgrade --force-with-deps ansible.posix
Installing Collection Requirements
When installing pip package requirements for Ansible collections, you must use the specific Python executable with the correct version. For example:
# Incorrect (might use the wrong Python version):
sudo pip install -r ~/.ansible/collections/ansible_collections/community/vmware/requirements.txt

# Correct (explicitly using Python 3.11):
sudo python3.11 -m pip install -r ~/.ansible/collections/ansible_collections/community/vmware/requirements.txt
This ensures that the dependencies are installed for the correct Python interpreter that Ansible is using.
Consider using a requirements.yml file to manage your collections:
# requirements.yml
collections:
  - name: community.general
    version: 5.0.0
  - name: ansible.posix
    version: 1.4.0
And install them with:
ansible-galaxy collection install -r requirements.yml
Step 6: Update Jenkins Configuration (If Applicable)
If you're using Jenkins to run Ansible playbooks, you'll need to update your Jenkins configuration to use the new Python and Ansible paths:
- Go to Jenkins > Manage Jenkins > Global Tool Configuration
- Update the Ansible installation path to point to the new version:
- For system-wide installations:
/usr/local/bin/ansible(likely unchanged, but verify) - For user-specific installations: Update to the correct path
- For system-wide installations:
- In your Jenkins pipeline or job configuration, specify the Python interpreter path if needed:
// Jenkinsfile example
pipeline {
    agent any
    environment {
        ANSIBLE_PYTHON_INTERPRETER = '/usr/bin/python3.10'
    }
    stages {
        stage('Run Ansible') {
            steps {
                sh 'ansible-playbook -i inventory playbook.yml'
            }
        }
    }
}
Step 7: Update Ansible Configuration Files (Additional Step)
You might need to update your ansible.cfg file to specify the new Python interpreter:
# In ansible.cfg
[defaults]
interpreter_python = /usr/bin/python3.10
This ensures that Ansible uses the correct Python version when connecting to remote hosts.
Step 8: Test Your Ansible Installation
Before relying on your upgraded Ansible for production work, test it thoroughly:
# Check Ansible version
ansible --version

# Run a simple ping test
ansible localhost -m ping

# Run a simple playbook
ansible-playbook test-playbook.yml
Troubleshooting Common Issues
Python Module Import Errors
If you encounter module import errors, ensure that all required dependencies are installed for the new Python version:
sudo python3.10 -m pip install paramiko jinja2 pyyaml cryptography
Path Issues
If running ansible command doesn't use the new version, check your PATH environment variable:
echo $PATH
which ansible
You might need to create symlinks or adjust your PATH to ensure the correct version is used.
Collection Compatibility
Some collections may not be compatible with the new Ansible or Python version. Check the documentation for your specific collections.
Conclusion
Upgrading Ansible when a new Python version is required involves several careful steps to ensure all components work together smoothly. By following this guide, you should be able to successfully upgrade your Ansible installation while minimizing disruption to your automation workflows.
Remember to always test in a non-production environment first, and maintain backups of your configuration and playbooks before making significant changes.
Happy automating!

It's 2025 and We are Still Revolutionizing Legacy IT with Modern DevOps and Platform Engineering to Unlock Business Potential
In the rapidly evolving digital landscape, traditional IT strategies are becoming relics and even risks for cybersecurity if not revised. Organizations clinging to outdated infrastructure and siloed development practices find themselves struggling to compete in a world that demands agility, innovation, and rapid value delivery. This is where modern DevOps and Platform Engineering emerge as transformative forces, bridging the gap between legacy systems and cutting-edge technological capabilities.
Limitations of Traditional IT Strategies
Traditional IT approaches are characterized by:
- High Cost due to vendor licensing (Currently: VMWare’s Broadcom Acquisition)
- Slow, cumbersome manual processes (ClickOps Repetition)
- Scary infrastructure management (Don’t touch it because it’s working!)
- Disconnected development and operations teams (IT Staff:That’s Dev’s responsibility)
- Manual, error-prone configuration processes (ClickOps Engineer did 10 server but forgot one step in 3 servers)
- Significant time-to-market delays (I.T. PM’s top skill is how to keep delaying project deadlines)
These challenges create a perfect storm of inefficiency that stifles innovation and increases operational costs. Companies find themselves trapped in a cycle of reactive maintenance rather than proactive innovation.
DevOps and Platform Engineering: A Shift to Modern Strategies
Our comprehensive DevOps and Platform Engineering services offer a holistic approach to transforming your IT infrastructure:
1. Unified Ecosystem Integration
We break down the walls between development, operations, and business teams, creating a seamless, collaborative environment. By implementing advanced integration strategies, we transform fragmented IT landscapes into cohesive, responsive systems that align directly with business objectives.
2. Infrastructure as Code (IaC) Revolution
Gone are the days of manual server configurations and time-consuming infrastructure management. Our Platform Engineering approach leverages cutting-edge Infrastructure as Code methodologies, enabling:
- Repeatable and consistent infrastructure deployment
- Automated configuration management
- Rapid scalability and flexibility
- Reduced human error
- Enhanced security through standardized deployment processes
3. Continuous Improvement and Innovation
We don’t just optimize your current systems; we create a framework for perpetual evolution. Our DevOps methodologies introduce:
- Continuous Integration and Continuous Deployment (CI/CD) pipelines
- Automated testing and quality assurance
- Real-time monitoring and proactive issue resolution
- Data-driven performance optimization
Tangible Benefits
Cost Efficiency
By streamlining processes and reducing manual interventions, organizations can significantly cut operational expenses while improving overall system reliability.
Accelerated Time-to-Market
Our platform engineering solutions reduce development cycles from months to weeks, allowing businesses to respond quickly to market demands and customer needs.
Enhanced Reliability and Performance
Automated monitoring, predictive maintenance, and robust architectural design ensure your systems remain stable, secure, and high-performing.
Extra Benefit: A Powerful Approach to Cybersecurity
In today’s threat landscape, cybersecurity is no longer a mere afterthought but a critical business imperative. DevOps methodologies revolutionize security by embedding protective measures directly into the development and operational processes, creating a proactive and resilient security posture.
Integrated Security: The DevOps Security Advantage
Traditional security approaches often treat cybersecurity as a final checkpoint, creating vulnerabilities and inefficiencies. DevOps transforms this paradigm through:
1. Continuous Security Integration (CSI)
- Automated Security Scanning: Implement real-time vulnerability detection throughout the development lifecycle
- Code-Level Security Checks: Identify and remediate potential security weaknesses before they reach production
- Comprehensive Threat Modeling: Proactively analyze and mitigate potential security risks during the design phase
2. Infrastructure as Code (IaC) Security Benefits
- Consistent Security Configurations: Eliminate human error in security setup through automated, standardized deployments
- Immutable Infrastructure: Reduce attack surfaces by creating predictable, easily replaceable system components
- Rapid Patch and Update Mechanisms: Quickly respond to emerging security threats across entire infrastructure
3. Advanced Monitoring and Incident Response
- Real-Time Threat Detection: Implement sophisticated monitoring tools that provide immediate insights into potential security incidents
- Automated Incident Response: Create predefined, executable playbooks for rapid threat mitigation
- Comprehensive Logging and Auditing: Maintain detailed, tamper-evident logs for forensic analysis and compliance requirements
Security Transformation in Practice
Consider the security journey of a typical enterprise:
- Before DevOps: Sporadic security audits, manual vulnerability assessments, and reactive threat management
- With DevOps: Continuous security integration, automated threat detection, and proactive risk mitigation
Compliance and Governance
DevOps approaches ensure:
- Consistent adherence to security standards and regulatory requirements
- Transparent and traceable security processes
- Reduced compliance risks through automated checks and balances
The Human Factor Challenge in I.T. : Understanding Resistance to Change
Behind every legacy system and outdated IT strategy lies a deeply human story of comfort, fear, and inertia. The “if it ain’t broke, don’t fix it” mentality is more than just a technical challenge—it’s a profound psychological barrier that organizations must overcome to remain competitive.
The Comfort of the Familiar
Imagine a seasoned IT professional who has spent years mastering a complex, albeit outdated, system. This system has become an extension of their expertise, a familiar landscape where they feel confident and capable. Changing this environment feels like more than a technical challenge—it’s a personal disruption. The human tendency to avoid uncertainty is a powerful force that keeps organizations trapped in technological stagnation.
Psychological Barriers to Technological Evolution
1. Fear of Obsolescence
Many IT professionals worry that new technologies will render their hard-earned skills irrelevant. This fear manifests as resistance to change, creating an invisible barrier to innovation. The “set it and forget it” approach becomes a psychological defense mechanism, a way to maintain a sense of control in a rapidly changing technological landscape.
2. The Illusion of Stability
There’s a comforting myth that stable systems are reliable systems. In reality, “stable” often means “slowly becoming obsolete.” Legacy systems create a false sense of security, masking underlying inefficiencies and potential risks.
The Hidden Costs of Inaction
What appears to be a stable, low-risk approach actually exposes organizations to significant dangers:
- Technical Debt Accumulation: Each day a legacy system remains unchanged, the cost of eventual modernization increases exponentially.
- Security Vulnerabilities: Outdated systems become prime targets for cybersecurity threats.
- Competitive Disadvantage: While your organization maintains the status quo, competitors are leveraging modern technologies to innovate and grow.
Breaking the Psychological Barrier
Successful digital transformation requires more than technical solutions—it demands a holistic approach that addresses human factors:
1. Empowerment Through Education
- Provide clear, supportive training that demonstrates the personal and professional benefits of new technologies
- Create learning paths that build confidence and excitement about technological change
- Highlight how new skills increase individual marketability and career potential
2. Gradual, Supportive Transformation
- Implement incremental changes that allow teams to adapt without overwhelming them
- Create a supportive environment that celebrates learning and adaptation
- Demonstrate tangible benefits through pilot projects and success stories
3. Reframing Change as Opportunity
Instead of viewing technological transformation as a threat, we help organizations see it as:
- A chance to solve long-standing operational challenges
- An opportunity to reduce daily frustrations and workload
- A path to more meaningful and strategic work
The Cost of Comfort
Let’s put the “set it and forget it” mentality into perspective:
Before Transformation
- Limited flexibility
- Increasing maintenance costs
- Growing security risks
- Decreasing employee satisfaction
- Reduced competitive ability
After DevOps Transformation
- Adaptive, responsive infrastructure
- Reduced operational overhead
- Enhanced security and reliability
- Increased employee engagement
- Competitive technological edge
A New Paradigm of Great Tech Solutions
DevOps and Platform Engineering are not just about implementing new tools—they’re about creating a culture of continuous improvement, learning, and adaptation. We understand that behind every system are human beings with their own experiences, fears, and aspirations.
Our approach goes beyond technical implementation. We provide:
- Comprehensive change management support
- Personalized skill development programs
- Continuous learning and support frameworks
- A partnership that values both technological innovation and human potential
Invitation to Modernizing I.T.
The world of technology waits for no one. The choice is not between changing or staying the same—it’s between leading or being left behind.
Are you ready to transform not just your technology, but your entire approach to innovation?
Let’s have a conversation about your unique challenges and opportunities.

OpenWebUI & Ollama: Experience AI on Your Terms with Local Hosting
In an era where AI solutions are behind subscription models behind cloud-based solutions, OpenWebUI and Ollama provide a powerful alternative that prioritize privacy, security, and cost efficiency. These open-source tools are revolutionizing how organizations and individuals can harness AI capabilities while maintaining complete control of models and data used.
Why use local LLMs? #1 Uncensored Models
One significant advantage of local deployment through Ollama is the ability to use a model of your choosing which includes unrestricted LLMs. While cloud-based AI services often implement various limitations and filters on their models to maintain content control and reduce liability, locally hosted models can be used without these restrictions. This provides several benefits:
- Complete control over model behavior and outputs
- Ability to fine-tune models for specific use cases without limitations
- Access to open-source models with different training approaches
- Freedom to experiment with model parameters and configurations
- No artificial constraints on content generation or topic exploration
This flexibility is particularly valuable for research, creative applications, and specialized industry use cases where standard content filters might interfere with legitimate work.
Here’s an amazing article from Eric Hartford on: Uncensored Models
Why use local LLMs? #2 Privacy
When running AI models locally through Ollama and OpenWebUI, all data processing occurs on your own infrastructure. This means:
- Sensitive data never leaves your network perimeter
- No third-party access to your queries or responses
- Complete control over data retention and deletion policies
- Compliance with data sovereignty requirements
- Protection from cloud provider data breaches
Implementation
Requirements:
- Docker
- NVIDIA Container Toolkit (Optional but Recommended)
- GPU + NVIDIA Cuda Installation (Optional but Recommended)
Step 1: Install Ollama
docker run -d -v ollama:/root/.ollama -p 11434:11434 --name ollama ollama/ollama:latestStep 2: Launch Open WebUI with the new features
docker run -d -p 3000:8080 --add-host=host.docker.internal:host-gateway -v open-webui:/app/backend/data --name open-webui --restart always ghcr.io/open-webui/open-webui:main
Need help setting up Docker and Nvidia Container toolkit?
OpenWeb UI and Ollama
OpenWebUI provides a sophisticated interface for interacting with locally hosted models while maintaining all the security benefits of local deployment. Key features include:
- Intuitive chat interface similar to popular cloud-based AI services
- Support for multiple concurrent model instances
- Built-in prompt templates and history management
- Customizable UI themes and layouts
- API integration capabilities for internal applications
Ollama simplifies the process of running AI models locally while providing robust security features:
- Easy model installation and version management
- Efficient resource utilization through optimized inference
- Support for custom model configurations
- Built-in model verification and integrity checking
- Container-friendly architecture for isolated deployments

Understanding Container Network Interfaces (CNI): A Practical Guide for Troubleshooting
As an administrator managing containerized environments, understanding Container Network Interfaces (CNI) is crucial for effective troubleshooting. This guide will help you understand CNI basics and common troubleshooting scenarios for Kubernetes clusters using routes and tunnels as Calico CNI does.
Key Components You Need to Grok
What is CNI?
We all know the NIC acronym which stands for Network Interface Card, similarly Container Network Interface (CNI) is like a universal plug adapter for container networking. It’s a standard way to configure network interfaces for Linux containers, regardless of the container runtime (Docker, containerd, etc.) or the network plugin (Calico, Flannel, Weave, etc.) you’re using.
1. CNI Bridge
- Think of it as a virtual switch on your host
- Usually named
cni0or similar - Connects all pods on a node
2. Pod Network Namespace
- Each pod gets its own isolated network space
- Contains its own network interface (usually
eth0) - Has its own IP address and routing table
3. Virtual Ethernet Pairs (veth)
- Work like a virtual network cable
- One end connects to the pod
- Other end connects to the CNI bridge
Common Troubleshooting Scenarios
Scenario 1: Pod Can’t Reach Other Pods
Check these first:
# Check pod's network interface

kubectl exec  -- ip addr
# Check pod’s routing table
kubectl exec — ip route
# Verify CNI bridge exists
ip link show cni0
Common causes:
- CNI plugin misconfiguration
- Network policy blocking traffic
- Corrupted CNI configuration
Scenario 2: Pod Can’t Reach External Services
Troubleshooting steps:
# Check node's DNS resolution

kubectl exec <pod-name> -- nslookup kubernetes.default
# Verify outbound connectivity
kubectl exec <pod-name> — ping 8.8.8.8
# Check pod’s DNS configuration
kubectl exec <pod-name> — cat /etc/resolv.conf
Scenario 3: Pod Stuck in “ContainerCreating” State
Investigation path:
# Check CNI logs

journalctl -u kubelet | grep cni
# Verify CNI configuration
ls /etc/cni/net.d/
# Check kubelet logs
journalctl -u kubelet
Good-to-have Troubleshooting Commands
1. Network Connectivity Checks
# Check pod networking details

kubectl get pod <pod-name> -o wide
# Test network connectivity between pods
kubectl exec <pod-name> — curl <other-pod-ip>
# View CNI configuration
cat /etc/cni/net.d/10-*.conf
2. Network Plugin Status
# Check CNI pods status (for Kubernetes)

kubectl get pods -n kube-system | grep cni
# Verify CNI binaries
ls /opt/cni/bin/
3. Node Network Status
# Check node interfaces

ip addr show
# View routing table
ip route
# Check iptables rules (if using iptables mode)
iptables-save | grep KUBE
Best Practices
- Regular Health Checks
- Monitor CNI plugin pods
- Check network latency between pods
- Verify DNS resolution regularly
- Documentation
- Keep network diagrams updated
- Document IP ranges and network policies
- Maintain troubleshooting runbooks
- Backup and Recovery
- Backup CNI configurations
- Keep known-good configurations ready
- Document recovery procedures

Azure Functions on your local Kubernetes Cluster: A Dev Powerhouse
In today’s fast-paced development landscape, the traditional Dev, QA, STG (Staging), PROD pipeline has become a standard practice. However, the increasing adoption of cloud-based environments has introduced new challenges, particularly in terms of cost and deployment speed. To address these issues, many organizations are exploring strategies to optimize their development and deployment processes. In this article we are exploring the use of our local Kubernetes cluster since Azure Functions can run on containers, this can improve your deployments and cost savings.
KEDA (Kubernetes Event-Driven Autoscaler)
KEDA is a tool that helps manage the scaling of your applications based on the workload they’re handling. Imagine having a website that experiences a sudden surge in traffic. KEDA can automatically increase the number of servers running your website to handle the increased load. Once the traffic subsides, it can also scale down all the way to zero PODS to reduce costs.
What is Scale to Zero? It’s a feature that allows applications to automatically scale down to zero instances when there’s no incoming traffic or activity. This means that the application is essentially turned off to save costs. However, as soon as activity resumes, the application can quickly scale back up to handle the load.
Caveat: Your app needs to be packaged in a way that it can start up fast and not have a high warm-up period.
How Does it Work? KEDA monitors application metrics and automatically scales the number of instances up or down based on predefined rules. KEDA supports a wide range of application metrics that can be used to trigger scaling actions. Here are some examples and the most commonly used ones:
- HTTP Metrics:
- HTTP requests: The number of HTTP requests received by an application.
- HTTP status codes: The frequency of different HTTP status codes returned by an application (e.g., 200, 404, 500).
- Queue Lengths:
- Message queue length: The number of messages waiting to be processed in a message queue.
- Job queue length: The number of jobs waiting to be executed in a job queue.
- Custom Metrics:
- Application-specific metrics: Any custom metrics that can be exposed by your application (e.g., database connection pool size, cache hit rate).
Choosing the right metrics depends on your specific application and scaling needs. For example, if your application relies heavily on message queues, monitoring queue lengths might be the most relevant metric. If your application is CPU-intensive, monitoring CPU utilization could be a good indicator for scaling.
KEDA also supports metric aggregators like Prometheus and StatsD, which can be used to collect and aggregate metrics from various sources and provide a unified view of your application’s performance.
Azure Container Registry
Azure Container Registry (ACR) and Docker Hub are both popular platforms for storing and managing container images. While both offer essential features, Azure Container Registry provides several distinct advantages that make it a compelling choice for many developers and organizations.
Key Benefits of Azure Container Registry
-
Integration with Azure Ecosystem:
- Seamless integration: ACR is deeply integrated with other Azure services, such as Azure Kubernetes Service (AKS), Azure App Service, and Azure Functions. This integration simplifies deployment and management workflows.
- Centralized management: You can manage container images, deployments, and other related resources from a single Azure portal.
-
Enhanced Security and Compliance:
- Private repositories: ACR allows you to create private repositories, ensuring that your container images are not publicly accessible.
- Role-based access control (RBAC): Implement fine-grained access control to manage who can view, create, and modify container images.
- Compliance: ACR meets various industry compliance standards, making it suitable for organizations with strict security requirements.
-
Performance and Scalability:
- Regional proximity: ACR offers multiple regions worldwide, allowing you to store and retrieve images from a location that is geographically closer to your users, improving performance.
- Scalability: ACR can automatically scale to handle increased demand for container images.
-
Advanced Features:
- Webhooks: Trigger custom actions (e.g., build pipelines, notifications) based on events in your registry, such as image pushes or deletes.
- Geo-replication: Replicate your images across multiple regions for improved availability and disaster recovery.
- Integrated vulnerability scanning: Automatically scan your images for known vulnerabilities and receive alerts.
-
Cost-Effective:
- Azure pricing: ACR is part of the Azure ecosystem, allowing you to leverage Azure’s flexible pricing models and potential cost savings through various discounts and promotions.
In summary, while Docker Hub is a valuable platform for sharing container images publicly, Azure Container Registry offers a more comprehensive solution tailored to the needs of organizations that require enhanced security, integration with Azure services, and performance optimization.
ACR and Kubernetes Integration
To pull container images from Azure Container Registry (ACR) in a Kubernetes manifest, you’ll need to add an imagePullSecret attribute to the relevant deployment or pod specification. This secret stores the credentials required to authenticate with ACR and pull the images.
Here’s a step-by-step guide on how to achieve this:
1. Create a Kubernetes Secret:
- Use the
kubectl create secret docker-registrycommand to create a secret that holds your ACR credentials. Replace<your-acr-name>with the actual name of your ACR instance and<your-acr-password>with your ACR password:
kubectl create secret docker-registry <your-acr-name> --username=<your-acr-username> --password=<your-acr-password>
2. Reference the Secret in Your Manifest:
- In your Kubernetes manifest (e.g., deployment.yaml, pod.yaml), add the
imagePullSecretsattribute to thespecsection of the deployment or pod. Reference the name of the secret you created in the previous step:
apiVersion: apps/v1
kind: Deployment
metadata:
  name: my-deployment
spec:
  replicas: 3
  selector:
    matchLabels:
      app: my-app
  template:
    metadata:
      labels:
        app: my-app
    spec:
      containers:
      - name: my-app
        image: <your-acr-name>.azurecr.io/<your-image-name>:<your-tag>
        imagePullPolicy: Always
      imagePullSecrets:
      - name: <your-secret-name>
Key Points:
- Replace
<your-acr-name>,<your-image-name>,<your-tag>, and<your-secret-name>with the appropriate values for your specific ACR instance, image, and secret. - The
imagePullPolicyis set toAlwaysto ensure that the image is always pulled from the registry, even if it’s already present on the node. You can adjust this policy based on your requirements.
Additional Considerations:
- For more complex scenarios, you might consider using service accounts and role-based access control (RBAC) to manage permissions for accessing ACR.
- If you’re using Azure Kubernetes Service (AKS), you can leverage Azure Active Directory (Azure AD) integration for authentication and authorization, simplifying the management of ACR credentials.
By following these steps, you can successfully configure your Kubernetes deployment or pod to pull container images from Azure Container Registry using the imagePullSecret attribute.