
Leveraging GitHub Actions for Efficient Infrastructure Automation with Separate Workflows.
Building infrastructure requires a well-defined pipeline. This article demonstrates how to leverage GitHub Actions to build an Amazon Machine Image (AMI) with Packer and then automatically trigger a separate Terraform workflow via Github’s Workflow API and pass the AMI ID as well.
Benefits:
- Streamlined workflow: Packer builds the AMI, and the AMI ID is seamlessly passed to the Terraform workflow for deployment.
- Reduced manual intervention: The entire process is automated, eliminating the need to manually trigger the Terraform workflow or update the AMI ID.
- Improved efficiency: Faster deployment cycles and reduced risk of errors due to manual configuration.
Why separate workflows?

First, think about a simple AWS architecture consisting on a Load Balancer in front of an Autoscaling group, you still need to build a VM image, make sure the load balancer has 2 networks for HA and add security groups for layer 4 access controls. The VM will be built by packer and terraform will deploy the rest of the components so your workflow consists of 2 jobs Packer builds, Terraform deploys but I am here to challenge this approach. You might think this goes against Build / Deploy workflows since most workflows or pipelines have the 2 job pattern of packer build then Terraform deploys but often times we see that we need to separate them because the work we do in Terraform is separate and shouldn’t depend on building an AMI every time.
Think of updating the number of machines on the scale set. Doing it manually will cause drift and the typical workflow will need to run packer before getting to Terraform which is not too bad but we are wasting some cycles.
Separating the workflows makes more sense because you can run terraform to update your infrastructure components from any API Client. Having Terraform in a separate workflow gets rid of the dependency of running packer every time. Ultimately, the choice between the two methods depends on your specific requirements and preferences.
Build and Trigger the Next Workflow
In the packer workflow we add a second job to trigger terraform. We have to pass our Personal Access Token (PAT) and the AMI_ID so that terraform can update the VM Autoscaling Group.
trigger_another_repo:

needs: packer

runs-on: ubuntu-latest

steps:

- name: Trigger second workflow

env:

AMITF: ${{ needs.packer.outputs.AMI_ID_TF }}

run: |

curl -X POST \

-H "Authorization: token ${{ secrets.PAT }}" \

-H "Accept: application/vnd.github.everest-preview+json" \

"https://api.github.com/repos/repo_name/workflow_name/dispatches" \

-d '{"event_type": "trigger_tf_build", "client_payload": {"variable_name": "${{ needs.packer.outputs.AMI_ID_TF }}"}}'
As you can see we are simply using CURL to send the data payload to the Terraform workflow.
The Triggered Workflow Requirements
For the Terraform workflow to start from the packer trigger we need a few simple things.
- Workflow trigger
on:

repository_dispatch:

types: [trigger_prod_tf_build]
- Confirm variable (Optional)
- name: Print Event Payload

run: echo "${{ github.event.client_payload.variable_name }}"
While combining Packer and Terraform into a single workflow can simplify things in certain scenarios, separating them provides more granular control, reusability, and scalability. The best approach depends on the specific needs and complexity of your infrastructure.

Containers for Data Scientists on top of Azure Container Apps
The Azure Data Science VMs are good for dev and testing and even though you could use a virtual machine scale set, that is a heavy and costly solution.
When thinking about scaling, one good solution is to containerize the Anaconda / Python virtual environments and deploy them to Azure Kubernetes Service or better yet, Azure Container Apps, the new abstraction layer for Kubernetes that Azure provides.
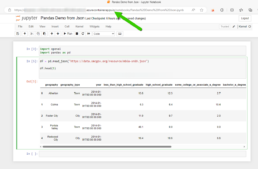
Here is a quick way to create a container with Miniconda 3, Pandas and Jupyter Notebooks to interface with the environment. Here I also show how to deploy this single test container it to Azure Container Apps.
The result:
A Jupyter Notebook with Pandas Running on Azure Container Apps.
Container Build
If you know the libraries you need then it would make sense to start with the lightest base image which is Miniconda3, you can also deploy the Anaconda3 container but that one might have libraries you might never use that might create unnecessary vulnerabilities top remediate.
Miniconda 3: https://hub.docker.com/r/continuumio/miniconda3
Anaconda 3: https://hub.docker.com/r/continuumio/anaconda3
Below is a simple dockerfile to build a container with pandas, openAi and tensorflow libraries.
FROM continuumio/miniconda3
RUN conda install jupyter -y --quiet && \ mkdir -p /opt/notebooks
WORKDIR /opt/notebooks
RUN pip install pandas
RUN pip install openAI
RUN pip install tensorflow
CMD ["jupyter", "notebook", "--ip='*'", "--port=8888", "--no-browser", "--allow-root"]
Build and Push the Container
Now that you have the container built push it to your registry and deploy it on Azure Container Apps. I use Azure DevOps to get the job done.
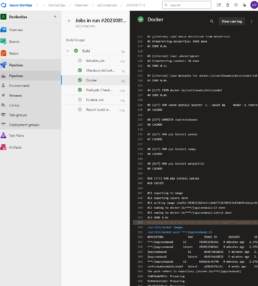
Here’s the pipeline task:
- task: Docker@2

inputs:

containerRegistry: 'dockerRepo'

repository: 'm05tr0/jupycondaoai'

command: 'buildAndPush'

Dockerfile: 'dockerfile'

tags: |

$(Build.BuildId)

latest
Deploy to Azure ContainerApps
Deploying to Azure Container Apps was painless, after understanding the Azure DevOps task, since I can include my ingress configuration in the same step as the container. The only requirement I had to do was configure DNS in my environment. The DevOps task is well documented as well but here’s a link to their official docs.
Architecture / DNS: https://learn.microsoft.com/en-us/azure/container-apps/networking?tabs=azure-cli
Azure Container Apps Deploy Task : https://github.com/microsoft/azure-pipelines-tasks/blob/master/Tasks/AzureContainerAppsV1/README.md
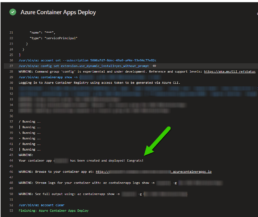
A few things I’d like to point out is that you don’t have to provide a username and password for the container registry the task gets a token from az login. The resource group has to be the one where the Azure Container Apps environment lives, if not a new one will be created. The target port is where the container listens on, see the container build and the jupyter notebooks are pointing to port 8888. If you are using the Container Apps Environment with a private VNET, setting the ingress to external means that the VNET can get to it not outside traffic from the internet. Lastly I disable telemetry to stop reporting.
task: AzureContainerApps@1

inputs:

azureSubscription: 'IngDevOps(XXXXXXXXXXXXXXXXXXXX)'

acrName: 'idocr'

dockerfilePath: 'dockerfile'

imageToBuild: 'idocr.azurecr.io/m05tr0/jupycondaoai'

imageToDeploy: 'idocr.azurecr.io/m05tr0/jupycondaoai'

containerAppName: 'datasci'

resourceGroup: 'IDO-DataScience-Containers'

containerAppEnvironment: 'idoazconapps'

targetPort: '8888'

location: 'East US'

ingress: 'external'

disableTelemetry: true
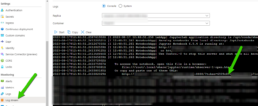
After deployment I had to get the token which was easy with the Log Stream feature under Monitoring. For a deployment of multiple Jupyter Notebooks it makes sense to use JupyterHub.
Boosting My Home Lab's Security and Performance with Virtual Apps from Kasm Containers
![]() In the past I’ve worked with VDI solutions like Citrix, VMWare Horizon, Azure Virtual Desktop and others but my favorite is Kasm. For me Kasm has a DevOps friendly and modern way of doing virtual apps and virtual desktops that I didn’t find with other vendors.
In the past I’ve worked with VDI solutions like Citrix, VMWare Horizon, Azure Virtual Desktop and others but my favorite is Kasm. For me Kasm has a DevOps friendly and modern way of doing virtual apps and virtual desktops that I didn’t find with other vendors.
With Kasm, apps and desktops run in isolated containers and I can access them easily with my browser, no need to install client software.
Here are my top 3 favorite features:
Boosting My Home Lab's Security and Performance with Virtual Apps from Kasm Containers!
#1 - Runs on the Home Lab!
Kasm Workspaces can be used to create a secure and isolated environment for running applications and browsing the web in your home lab. This can help to protect your devices from malware and other threats.
The community edition is free for 5 concurrent sessions.
If you are a Systems Admin or Engineer you can use it at home for your benefit but also to get familiar with the configuration so that you are better prepared for deploying it at work.
#2 - Low Resource Utilization
Kasm container apps are lightweight and efficient, so they can run quickly and without consuming a lot of resources. This is especially beneficial if you have a limited amount of hardware resources like on a home lab. I run mine in a small ProxMox cluster and offloads work from my main PC. You can also set the amount of compute when configuring your containerized apps.
#3 - Security
Each application is run in its own isolated container, which prevents them from interacting with each other or with your PC. This helps to prevent malware or other threats from spreading from one application to another.
The containers could run on isolated Docker networks and with a good firewall solution you can even prevent a self-replicating trojan by segmenting your network and only allowing the necessary ports and traffic flow. Example, if running the Tor Browser containerized app you could only allow it to go outbound to the internet and block SMB (Port 445) from your internal network. If the containerized app gets infected with something like the Emotet Trojan you could be preventing it from spreading further and you could kill the isolated container without having to shutdown or reformatting your local computer.
Code Vulnerability scanning: You can scan your container images in your CI/CD pipelines for vulnerabilities, which helps to identify and fix security weaknesses before you deploy them and before they can be exploited.

Azure Open AI: Private and Secure "ChatGPT like" experience for Enterprises.
Azure provides the OpenAI service to address the concerns for companies and government agencies that have strong security regulations but want to leverage the power of AI as well.
Most likely you’ve used one of the many AI offerings out there. Open AI’s ChatGPT, Google Bard, Google PaLM with MakerSuite, Perplexity AI, Hugging Chat and many more have been in the latest hype and software companies are racing to integrate them into their products. The main way is to buy a subscription and connect to the ones that offer their API over the internet but as an DevSecOps engineer here’s where the fun starts.
A lot of companies following good security practices block traffic to and from the internet so the first part of all this will be to open the firewall. Next you must protect the credentials of the API user so that it doesn’t get hacked and access will reveal what you are up to. Then you have to trust that OpenAI is not using your data to train their models and that they are keeping your company’s data safe.
It could take a ton of time to plan, design and deploy a secured infrastructure for using large language models and unless you have a very specific use case it might be overkill to build your own.
Here’s a breakdown of a few infrastructure highlights about this service.
3 Main Features
Privacy and Security
Your Chat-GPT like interface called Azure AI Studio runs in your private subscription. It can be linked to one of your VNETs so that you can use internal routing and you can also add private endpoints so that you don’t even have to use it over the internet.

Even if you have to use it over the internet you can lock it down to only allow your public IPs and your developers will need a token for authentication as well that can be scripted to rotate every month.
Pricing
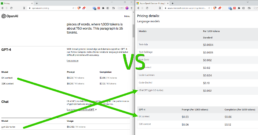
Common Models
- GPT-4 Series: The GPT-4 models are like super-smart computers that can understand and generate human-like text. They can help with things like understanding what people are saying, writing stories or articles, and even translating languages.
Key Differences from GPT-3:
- Model Size: GPT-4 models tend to be larger in terms of parameters compared to GPT-3. Larger models often have more capacity to understand and generate complex text, potentially resulting in improved performance.
- Training Data: GPT-4 models might have been trained on a more extensive and diverse dataset, potentially covering a broader range of topics and languages. This expanded training data can enhance the model’s knowledge and understanding of different subjects.
- Improved Performance: GPT-4 models are likely to demonstrate enhanced performance across various natural language processing tasks. This improvement can include better language comprehension, generating more accurate and coherent text, and understanding context more effectively.
- Fine-tuning Capabilities: GPT-4 might introduce new features or techniques that allow for more efficient fine-tuning of the model. Fine-tuning refers to the process of training a pre-trained model on a specific dataset or task to make it more specialized for that particular use case.
- Contextual Understanding: GPT-4 models might have an improved ability to understand context in a more sophisticated manner. This could allow for a deeper understanding of long passages of text, leading to more accurate responses and better contextual awareness in conversation.
- GPT-3 Base Series: These models are also really smart and can do similar things as GPT-4. They can generate text for writing, help translate languages, complete sentences, and understand how people feel based on what they write.
- Codex Series: The Codex models are designed for programming tasks. They can understand and generate computer code. This helps programmers write code faster, get suggestions for completing code, and even understand and improve existing code.
- Embeddings Series: The Embeddings models are like special tools for understanding text. They can turn words and sentences into numbers that computers can understand. These numbers can be used to do things like classify text into different categories, find information that is similar to what you’re looking for, and even figure out how people feel based on what they write.
Getting Access to it!
Although the service is Generally Available (GA) it is only available in East US and West Europe. You also have to submit an application so that MS can review your company and use case so they can approve or deny your request. This could be due to capacity and for Microsoft to gather information on how companies will be using the service.
The application is here: https://aka.ms/oai/access
Based on research and experience getting this for my clients I always recommend only pick what you initially need and not get too greedy. It would be also wise to speak with your MS Rep and take them out for a beer! For example if you just need code generation then just select the codex option.
Lately getting the service has been easier to get, hopefully soon we won’t need the form and approval dance.

Deploy Azure Container Apps with the native AzureRM Terraform provider, no more AzAPI!
Azure has given us great platforms to run containers. Starting with Azure Container Instance where you can run a small container group just like a docker server and also Azure Kubernetes Service where you can run and manage Kubernetes clusters and containers at scale. Now, the latest Kubernetes abstraction from Azure is called Container Apps!
When a service comes out in a cloud provider their tools are updated right away so when Contrainer Apps came out you could deploy it with ARM or Bicep. You could still deploy it with Terraform by using the AzAPI provider which interacts directly with Azures API but as of a few weeks back (from the publish date of this article) you can use the native AzureRM provider to deploy it.
Code Snippet
resource "azurerm_container_app_environment" "example" {
  name                       = "Example-Environment"
  location                   = azurerm_resource_group.example.location
  resource_group_name        = azurerm_resource_group.example.name
  log_analytics_workspace_id = azurerm_log_analytics_workspace.example.id
}
resource "azurerm_container_app" "example" {
  name                         = "example-app"
  container_app_environment_id = azurerm_container_app_environment.example.id
  resource_group_name          = azurerm_resource_group.example.name
  revision_mode                = "Single"

  template {
    container {
      name   = "examplecontainerapp"
      image  = "mcr.microsoft.com/azuredocs/containerapps-helloworld:latest"
      cpu    = 0.25
      memory = "0.5Gi"
    }
  }
}
Sources
How to use the Azure Private Link with uncommon or new PaaS offerings. You need the subresource names!
Azure, like other clouds, has a private link feature that allows connectivity to stay “inside” the network if you have an Express Route or a P2P. The one advantage is that you don’t have to have an internet facing endpoint, you don’t have to whitelist domains or insane ranges of IPs and you can also use your internal DNS.
I like to use Terraform to build the different PaaS offerings and in the same templates I can add the private endpoints to the services. The one thing that took me a while to find is the sub resource names. See below:
resource "azurerm_private_endpoint" "keyvault" {

name                = "key_vault-terraform-endpoint"

location            = azurerm_resource_group.rg.location

resource_group_name = azurerm_resource_group.rg.name

subnet_id           = "${data.azurerm_subnet.rg.id}"
private_service_connection {
name = “key_vault-terraform-privateserviceconnection”
private_connection_resource_id = azurerm_key_vault.main.id
subresource_names = [ “vault” ]
is_manual_connection = false
}
A private-link resource is the destination target of a specified private endpoint.
Some Benefits
The benefits to most common private endpoints I’ve used are for the following services are
- Azure Container Registry
- The benefit here is that I can have a Docker Hub like container registry and I can push/pull containers to my local dev without having to go out to the internet
- Another benefit is that I can hook up security scans as well
- Azure SQL DBs
- The benefit is that again you can connect from a local server to this DB using internal IPs and DNS
- Azure Key Vault
- The benefit here is that your services and vault are not in the internet. Even in the internet they will need accounts to login but I like to know that the service can only be used inside the network.
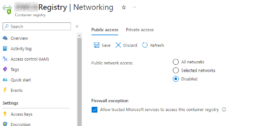
If all your services are inside then there is no need to allow public networks. You can disable access and only allow trusted Microsoft Services (Log Analytics, Defender, etc.)
Disable public access to Azure Container Registry
Book Review: Sandworm - A New Era of Cyberwar and the Hunt for Kremlin's Most Dangerous Hackers
Book Review: Sandworm - A New Era of Cyberwar and the Hunt for Kremlin's Most Dangerous Hackers

Imagine you are in the office, in front of your computer, focused on your work but all of the sudden your computer reboots but this time it doesn’t come back to a login screen, instead it shows a ransomware message.
What do you do now?
Youtube Link to book review for Sandworm.
One of my favorite books I read last year was Sandworm: A New Era of Cyberwar and the Hunt for the Kremlin’s Most Dangerous Hackers” by Andy Greenberg. I highly recommend this book not only for Cyber Security and Tech professionals but also for anyone that wants to better understand the motives and evolution of hacking groups around the world. It reads like a true crime story and it provides a good background to understand how the hacking group evolved and was able to launch a devastating attack.
Who is Sandworm?
Sandworm, also known as APT28 and Fancy Bear, is a state-sponsored hacking group that is believed to operate on behalf of the Russian government. Other countries have their state-sponsored groups as well but in this article we will only focus on Sandworm. Investigations show that the group has been active since at least 2007 although it could be an evolution of another set of groups. They have been linked to a number of high-profile cyberattacks against governments, military organizations, and other targets around the world.
What are their motives?
According to experts, Sandworm has primarily been motivated by geopolitical objectives and has been used as a tool of Russian statecraft. The group has been used to gather intelligence, disrupt critical infrastructure, and spread propaganda and disinformation. Some of the specific goals that Sandworm has been associated with include:
- Gathering intelligence on governments and military organizations in order to advance Russian interests
- Disrupting the operations of governments and military organizations in order to weaken their ability to resist Russian aggression
- Spread propaganda and disinformation in order to shape public opinion in favor of Russian policies
- Sabotaging critical infrastructure in order to disrupt the economies and societies of targeted countries
Overall, Sandworm’s activities have been aimed at furthering the interests of the Russian state and undermining the security and stability of other countries.
Hackers and Software Development - Evolving from mimikatz
Mimikatz is a tool that can be used to obtain the passwords of Windows users, allowing an attacker to gain unauthorized access to a system. It was developed by French security researcher Benjamin Delpy and has been used by a variety of hacking groups, including Sandworm.
It is not clear exactly how Sandworm came to use Mimikatz in its operations. However, Mimikatz has become a popular tool among hackers due to its effectiveness at extracting passwords, and it is likely that Sandworm, like many other groups, adopted it as a means of gaining access to targeted systems.
Once Mimikatz has been used to obtain passwords, an attacker can use them to log into systems and gain access to sensitive data, install malware, or perform other malicious actions. Sandworm and other groups have used Mimikatz as part of their toolkit for conducting cyber espionage and other types of attacks.
Damage and Impact
Maersk, a Danish shipping and logistics company, was one of the organizations that was significantly impacted by the NotPetya cyberattack in 2017. NotPetya was a strain of ransomware that was initially spread through a software update mechanism for a Ukrainian accounting program, but it quickly spread to other countries and caused widespread damage to businesses and government organizations around the world.
Maersk was one of the hardest hit companies, with the attack causing significant disruption to its operations. The attack encrypted the company’s data and rendered its systems inoperable, resulting in the shut down of a number of its critical systems, including its email and financial systems. The company estimated that the attack cost it upwards of $300 million in lost revenue and expenses related to the recovery effort.
In the aftermath of the attack, Maersk worked to restore its systems and rebuild its operations, but the damage caused by the attack took months to fully repair. The incident highlights the significant risks and costs that businesses can face as a result of cyberattacks.
maerks


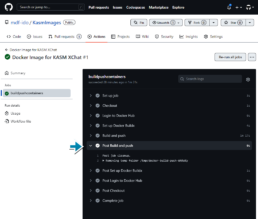
Using Github Actions to Build a Kasm Workspace for XChat IRC Client
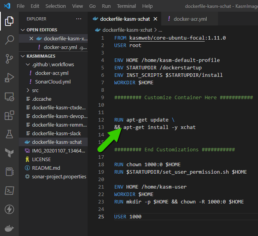
I really like building and customizing my own Kasm images to use containers to run my applications instead of installing them directly in my computer. Here’s how I built the xchat client Kasm Workspace.
Dockerfile
Most and I mean most of the work is done by the Kasm team since the base images are loaded with all the dependencies needed for Kasm Workspaces and all you have to do is install your app and customize it.
Github Actions for Docker:
- Create a new secret named
DOCKER_HUB_USERNAMEand your Docker ID as value. - Create a new Personal Access Token (PAT) for Docker Hub.
- Add the PAT as a second secret in your GitHub repository, with the name
DOCKER_HUB_ACCESS_TOKEN.
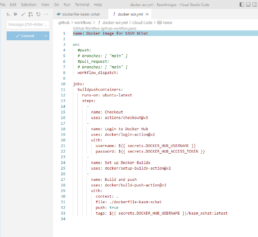
The Github action will run to login, build and push your container to your DockerHub account. Once that’s ready you can proceed to configure kasm to use your container image.
Configuration for Kasm
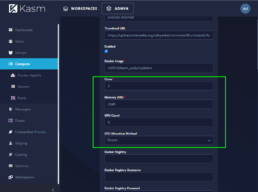
Once the container is available in the DockerHub repo or other container registries it can be pulled to the Kasm server.
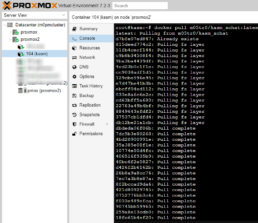
Once the container is in my pulled images I can setup the Kasm Image
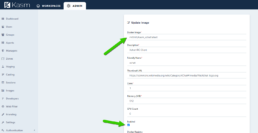
Now it is ready for me to use and further customize.


Kubernetes Secret for Fleet Elasticsearch Agents
 If you are having issues with your Elasticsearch Agents not getting the correct Fleet server enrollment token then this fix is for you. Elasticsearch support docs recommend adding the token as clear text in the Elastic agent daemonset manifest but here I show how to add it in the daemonset but as a kubernetes secret!
Read more
Self-hosted Postgresql crashed and no backup! How to restore you DB from raw files?
![]()
Here's a great story on why it's good to automate builds, backups and restores, I had the privilege of working on an issue that spelled trouble from the beginning. A long long time ago there was a POC and lots of hype around the product so this POC, which was done manually, turned into PROD. Couple months later the single container running the postgres database crashes and there was no backup. Luckily the container was running in kubernetes and it had a persistent volume with the pgdata directory in it. The container crashed and was not able to come back because of an upgrade done to the DB so the MOST IMPORTANT thing you can do here is to protect the raw files by copying them into another directory. In a previous issue I worked on I have seen deployments that even when you use the existing claim they can wipe the data in it and start fresh, so backup the files you have into a compressed folder and create another copy to restore, this way you can at least have a working base.