
Deploying Azure Functions with Azure DevOps: 3 Must-Dos! Code Security Included
Azure Functions is a serverless compute service that allows you to run your code in response to various events, without the need to manage any infrastructure. Azure DevOps, on the other hand, is a set of tools and services that help you build, test, and deploy your applications more efficiently. Combining these two powerful tools can streamline your Azure Functions deployment process and ensure a smooth, automated workflow.
In this blog post, we’ll explore three essential steps to consider when deploying Azure Functions using Azure DevOps.
1. Ensure Consistent Python Versions
When working with Azure Functions, it’s crucial to ensure that the Python version used in your build pipeline matches the Python version configured in your Azure Function. Mismatched versions can lead to unexpected runtime errors and deployment failures.
To ensure consistency, follow these steps:
- Determine the Python version required by your Azure Function. You can find this information in the
requirements.txtfile or thehost.jsonfile in your Azure Functions project. - In your Azure DevOps pipeline, use the
UsePythonVersiontask to set the Python version to match the one required by your Azure Function.
- task: UsePythonVersion@0

inputs:

versionSpec: '3.9'

addToPath: true- Verify the Python version in your pipeline by running
python --versionand ensuring it matches the version specified in the previous step.
2. Manage Environment Variables Securely
Azure Functions often require access to various environment variables, such as database connection strings, API keys, or other sensitive information. When deploying your Azure Functions using Azure DevOps, it’s essential to handle these environment variables securely.
Here’s how you can approach this:
- Store your environment variables as Azure DevOps Service Connections or Azure Key Vault Secrets.
- In your Azure DevOps pipeline, use the appropriate task to retrieve and set the environment variables. For example, you can use the
AzureKeyVaulttask to fetch secrets from Azure Key Vault.
- task: AzureKeyVault@1

inputs:

azureSubscription: 'Your_Azure_Subscription_Connection'

KeyVaultName: 'your-keyvault-name'

SecretsFilter: '*'

RunAsPreJob: false- Ensure that your pipeline has the necessary permissions to access the Azure Key Vault or Service Connections.
3. Implement Continuous Integration and Continuous Deployment (CI/CD)
To streamline the deployment process, it’s recommended to set up a CI/CD pipeline in Azure DevOps. This will automatically build, test, and deploy your Azure Functions whenever changes are made to your codebase.
Here’s how you can set up a CI/CD pipeline:
- Create an Azure DevOps Pipeline and configure it to trigger on specific events, such as a push to your repository or a pull request.
- In the pipeline, include steps to build, test, and package your Azure Functions project.
- Add a deployment task to the pipeline to deploy your packaged Azure Functions to the target Azure environment.
# CI/CD pipeline

trigger:

- mainvmImage: ‘ubuntu-latest’
– task: UsePythonVersion@0
inputs:
versionSpec: ‘3.9’
addToPath: true
pip install -r requirements.txt
displayName: ‘Install dependencies’
inputs:
azureSubscription: ‘Your_Azure_Subscription_Connection’
appName: ‘your-function-app-name’
appType: ‘functionApp’
deployToSlotOrASE: true
resourceGroupName: ‘your-resource-group-name’
slotName: ‘production’
By following these three essential steps, you can ensure a smooth and reliable deployment of your Azure Functions using Azure DevOps, maintaining consistency, security, and automation throughout the process.
Bonus: Embrace DevSecOps with Code Security Checks
As part of your Azure DevOps pipeline, it’s crucial to incorporate security checks to ensure the integrity and safety of your code. This is where the principles of DevSecOps come into play, where security is integrated throughout the software development lifecycle.
Here’s how you can implement code security checks in your Azure DevOps pipeline:
- Use Bandit for Python Code Security: Bandit is a popular open-source tool that analyzes Python code for common security issues. You can integrate Bandit into your Azure DevOps pipeline to automatically scan your Azure Functions code for potential vulnerabilities.
- script: |

pip install bandit

    bandit -r your-functions-directory -f custom -o bandit_report.json

displayName: 'Run Bandit Security Scan'

- task: PublishBuildArtifacts@1

inputs:

PathtoPublish: 'bandit_report.json'

ArtifactName: 'bandit-report'

publishLocation: 'Container'- Leverage the Safety Tool for Dependency Scanning: Safety is another security tool that checks your Python dependencies for known vulnerabilities. Integrate this tool into your Azure DevOps pipeline to ensure that your Azure Functions are using secure dependencies.
- script: |

pip install safety

    safety check --full-report

displayName: 'Run Safety Dependency Scan'- Review Security Scan Results: After running the Bandit and Safety scans, review the generated reports and address any identified security issues before deploying your Azure Functions. You can publish the reports as build artifacts in Azure DevOps for easy access and further investigation.
By incorporating these DevSecOps practices into your Azure DevOps pipeline, you can ensure that your Azure Functions are not only deployed efficiently but also secure and compliant with industry best practices.

Containers for Data Scientists on top of Azure Container Apps
The Azure Data Science VMs are good for dev and testing and even though you could use a virtual machine scale set, that is a heavy and costly solution.
When thinking about scaling, one good solution is to containerize the Anaconda / Python virtual environments and deploy them to Azure Kubernetes Service or better yet, Azure Container Apps, the new abstraction layer for Kubernetes that Azure provides.
Here is a quick way to create a container with Miniconda 3, Pandas and Jupyter Notebooks to interface with the environment. Here I also show how to deploy this single test container it to Azure Container Apps.
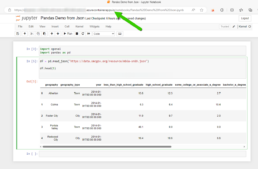
The result:
A Jupyter Notebook with Pandas Running on Azure Container Apps.
Container Build
If you know the libraries you need then it would make sense to start with the lightest base image which is Miniconda3, you can also deploy the Anaconda3 container but that one might have libraries you might never use that might create unnecessary vulnerabilities top remediate.
Miniconda 3: https://hub.docker.com/r/continuumio/miniconda3
Anaconda 3: https://hub.docker.com/r/continuumio/anaconda3
Below is a simple dockerfile to build a container with pandas, openAi and tensorflow libraries.
FROM continuumio/miniconda3
RUN conda install jupyter -y --quiet && \ mkdir -p /opt/notebooks
WORKDIR /opt/notebooks
RUN pip install pandas
RUN pip install openAI
RUN pip install tensorflow
CMD ["jupyter", "notebook", "--ip='*'", "--port=8888", "--no-browser", "--allow-root"]
Build and Push the Container
Now that you have the container built push it to your registry and deploy it on Azure Container Apps. I use Azure DevOps to get the job done.
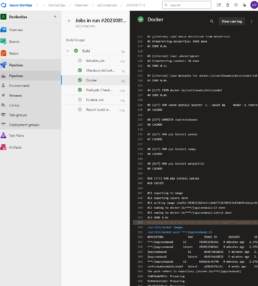
Here’s the pipeline task:
- task: Docker@2

inputs:

containerRegistry: 'dockerRepo'

repository: 'm05tr0/jupycondaoai'

command: 'buildAndPush'

Dockerfile: 'dockerfile'

tags: |

$(Build.BuildId)

latest
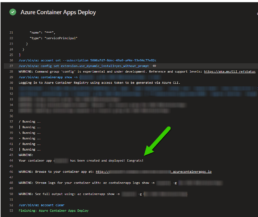
Deploy to Azure ContainerApps
Deploying to Azure Container Apps was painless, after understanding the Azure DevOps task, since I can include my ingress configuration in the same step as the container. The only requirement I had to do was configure DNS in my environment. The DevOps task is well documented as well but here’s a link to their official docs.
Architecture / DNS: https://learn.microsoft.com/en-us/azure/container-apps/networking?tabs=azure-cli
Azure Container Apps Deploy Task : https://github.com/microsoft/azure-pipelines-tasks/blob/master/Tasks/AzureContainerAppsV1/README.md
A few things I’d like to point out is that you don’t have to provide a username and password for the container registry the task gets a token from az login. The resource group has to be the one where the Azure Container Apps environment lives, if not a new one will be created. The target port is where the container listens on, see the container build and the jupyter notebooks are pointing to port 8888. If you are using the Container Apps Environment with a private VNET, setting the ingress to external means that the VNET can get to it not outside traffic from the internet. Lastly I disable telemetry to stop reporting.
task: AzureContainerApps@1

inputs:

azureSubscription: 'IngDevOps(XXXXXXXXXXXXXXXXXXXX)'

acrName: 'idocr'

dockerfilePath: 'dockerfile'

imageToBuild: 'idocr.azurecr.io/m05tr0/jupycondaoai'

imageToDeploy: 'idocr.azurecr.io/m05tr0/jupycondaoai'

containerAppName: 'datasci'

resourceGroup: 'IDO-DataScience-Containers'

containerAppEnvironment: 'idoazconapps'

targetPort: '8888'

location: 'East US'

ingress: 'external'

disableTelemetry: true
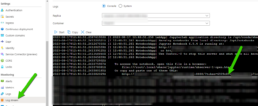
After deployment I had to get the token which was easy with the Log Stream feature under Monitoring. For a deployment of multiple Jupyter Notebooks it makes sense to use JupyterHub.

Don't be a part of the naughty list of the internet exposed Kubernetes clusters!
A finding by the Shadow Foundation uncovered close to half a million k8s endpoints on the internet which can be targets to exploits. One factor is that by default these clusters are built with public IPs since cloud providers are outside your network and not all companies can have ExpressRoutes or dedicated point to point connectivity. To increase the security and have easier routing of your kubernetes cluster you can create a private cluster. In Azure Kubernetes Service the private cluster assigns an internal IP to your k8s API but NGINX defaults to external IP so in this article I walk through configuring NGINX to have internal IPs as well to keep it all inside the network.
Self-Healing I.T. Orchestration with Jenkins, Powershell, ServiceNow and Azure DevOps!

Most I.T. ticketing systems have an incident module to wait for users to submit issues so that the team can triage and react to solve the issue. In some cases you can spot repetitive issues and automate a fix or workaround to, at least, proactively bring services back online faster than waiting for an user to get an issue and then report the incident. Another benefit on automating fixes or work arounds is that they work 24/7 and they respond faster then the on call person. In this article I will show how to use Jenkins, Powershell, ServiceNow and Azure DevOps to orchestrate a server reboot after detecting a specific issue in the event log of a Windows server.

Easiest Way to Deploy Ubuntu 20.04 with NVIDIA Drivers and the Latest CUDA toolkit via Packer.

I am building an analytics system that deploys containers on top of the Azure NCasT4_v3-series virtual machines which are powered by Nvidia Tesla T4 GPUs and AMD EPYC 7V12(Rome) CPUs. I am deploying the VM from an Azure DevOps pipeline using Hashicorp Packer and after trying a few ways I found a very easy way to deploy the VM, Driver and Cuda Toolkit which I will share in this article.

Avoid Self-Monitoring on your PROD ElasticSearch Cluster! Ship logs to a separate deployment.

It is highly recommended to disable self-monitoring on your production Elasticsearch deployment for performance and built-in support in Elastic Cloud on Kubernetes. In this article we go over configuring the monitoring cluster.
Deploy A Private Elastic Cloud Kubernetes Cluster On Azure DevOps Pipelines For CI/CD

ElasticSearch has developed a great Operator for Kubernetes to orchestrate tasks to make things easier to deploy and prevent cowboy engineers like me forcing changes that end up breaking stuff :D . In this article I will go over deploying ECK on AKS via ADO and I will share some FYIs. (Too many acronyms, get ready for more.)
How to create an Azure DevOps Service Connection to my private AKS Cluster?

Ok, so we can deploy AKS and restrict the IPs that can consume the K8S API but this is still "out in the internet" which might not sit right with management or security. So.... we can deploy a private AKS (article coming soon..) and keep all traffic internal. The trade off is that a private AKS cluster's api endpoint cannot be restricted to specific subnets from the AKS console but you can deploy NSGs if needed. In this article we go trough setting up a service connection so you can deploy from Azure DevOps
Working with secure files (certs) in Azure DevOps and Terraform the easy way without compromising security.

The documentation from Hashicorp is great! If you are using your shell with terraform then the docs will save you lots of time but eventually you'll want to use terraform in your pipelines and this is where things change, for better! In this article we show how you can save the steps of creating an Azure vault, setting permissions and uploading secrets or certs to use later on. Since we are using Azure DevOps pipelines we can use the secure file download task to get our cert on the agent and upload it directly to the app service in our case. We are not compromising security by making it simpler which is the best part.
Want to make I.T. Happy? Automate Cert Import and Binding for IIS.

An important part of any web server build is to install a valid SSL cert and bind it to the sites. In a regular IT team certs are misunderstood since it is something they do only when they expire or when there is a new server to build, some even fear dealing with certs. New IT teams are building servers and infrastructure as code and this step makes it easy to deploy and bind the certs when using windows and IIS.