
Comprehensive Guide to Upgrading Ansible via Pip with New Python Versions on Ubuntu 20.04
For system administrators and DevOps engineers using Ansible in production environments, upgrading Ansible can sometimes be challenging, especially when the new version requires a newer Python version than what's available by default in Ubuntu 20.04. This guide walks through the process of upgrading Ansible installed via pip when a new Python version is required.
Why This Matters
Ubuntu 20.04 LTS ships with Python 3.8 by default. However, newer Ansible versions may require Python 3.9, 3.10, or even newer. Since Ansible in our environment is installed via pip rather than the APT package manager, we need a careful approach to manage this transition without breaking existing automation.
Prerequisites
- Ubuntu 20.04 LTS system
- Sudo access
- Existing Ansible installation via pip
- Backup of your Ansible playbooks and configuration files
Step 1: Install the Python Repository "Snakes"
The "deadsnakes" PPA provides newer Python versions for Ubuntu. This repository allows us to install Python versions that aren't available in the standard Ubuntu repositories.
# Add the deadsnakes PPA
sudo add-apt-repository ppa:deadsnakes/ppa

# Update package lists
sudo apt update
Step 2: Install the New Python Version and Pip
Install the specific Python version required by your target Ansible version. In this example, we'll use Python 3.10, but adjust as needed.
# Install Python 3.10 and development headers
sudo apt install python3.10 python3.10-dev python3.10-venv

# Install pip for Python 3.10
curl -sS https://bootstrap.pypa.io/get-pip.py | sudo python3.10

# Verify the installation
python3.10 --version
python3.10 -m pip --version
Note: After this step, you will have different Python versions installed, and you will need to use them with the correct executable as shown above (e.g.,
python3.10for Python 3.10,python3.8for the default Ubuntu 20.04 Python).
Warning: Do not uninstall the Python version that comes with the OS (Python 3.8 in Ubuntu 20.04), as this can cause serious issues with the Ubuntu system. Many system utilities depend on this specific Python version.
Step 3: Uninstall Ansible from the Previous Python Version
Before installing the new version, remove the old Ansible installation to avoid conflicts.
# Find out which pip currently has Ansible installed
which ansible
# This will show something like /usr/local/bin/ansible or ~/.local/bin/ansible

# Check which Python version is used for the current Ansible
ansible --version
# Look for the "python version" line in the output

# Uninstall Ansible from the previous Python version
python3.8 -m pip uninstall ansible ansible-core

# If you had other Ansible-related packages, uninstall those too
python3.8 -m pip uninstall ansible-runner ansible-builder
Step 4: Install Ansible with the New Python Version
Install Ansible for both system-wide (sudo) and user-specific contexts as needed:
System-Wide Installation (sudo)
# Install Ansible system-wide with the new Python version
sudo python3.10 -m pip install ansible

# Verify the installation
ansible --version
# Confirm it shows the new Python version
User-Specific Installation (if needed)
# Install Ansible for your user with the new Python version
python3.10 -m pip install --user ansible

# Verify the installation
ansible --version
Reinstall Additional Pip Packages with the New Python Version
If you had additional pip packages installed for Ansible, reinstall them with the --force-reinstall flag to ensure they use the new Python version:
# Reinstall packages with the new Python version
sudo python3.10 -m pip install --force-reinstall ansible-runner ansible-builder

# For user-specific installations
python3.10 -m pip install --user --force-reinstall ansible-runner ansible-builder
Step 5: Update Ansible Collections
Ansible collections might need to be updated to work with the new Ansible version:
# List currently installed collections
ansible-galaxy collection list

# Update all collections
ansible-galaxy collection install --upgrade --force-with-deps <collection_name>

# Example:
# ansible-galaxy collection install --upgrade --force-with-deps community.general
# ansible-galaxy collection install --upgrade --force-with-deps ansible.posix
Installing Collection Requirements
When installing pip package requirements for Ansible collections, you must use the specific Python executable with the correct version. For example:
# Incorrect (might use the wrong Python version):
sudo pip install -r ~/.ansible/collections/ansible_collections/community/vmware/requirements.txt

# Correct (explicitly using Python 3.11):
sudo python3.11 -m pip install -r ~/.ansible/collections/ansible_collections/community/vmware/requirements.txt
This ensures that the dependencies are installed for the correct Python interpreter that Ansible is using.
Consider using a requirements.yml file to manage your collections:
# requirements.yml
collections:
  - name: community.general
    version: 5.0.0
  - name: ansible.posix
    version: 1.4.0
And install them with:
ansible-galaxy collection install -r requirements.yml
Step 6: Update Jenkins Configuration (If Applicable)
If you're using Jenkins to run Ansible playbooks, you'll need to update your Jenkins configuration to use the new Python and Ansible paths:
- Go to Jenkins > Manage Jenkins > Global Tool Configuration
- Update the Ansible installation path to point to the new version:
- For system-wide installations:
/usr/local/bin/ansible(likely unchanged, but verify) - For user-specific installations: Update to the correct path
- For system-wide installations:
- In your Jenkins pipeline or job configuration, specify the Python interpreter path if needed:
// Jenkinsfile example
pipeline {
    agent any
    environment {
        ANSIBLE_PYTHON_INTERPRETER = '/usr/bin/python3.10'
    }
    stages {
        stage('Run Ansible') {
            steps {
                sh 'ansible-playbook -i inventory playbook.yml'
            }
        }
    }
}
Step 7: Update Ansible Configuration Files (Additional Step)
You might need to update your ansible.cfg file to specify the new Python interpreter:
# In ansible.cfg
[defaults]
interpreter_python = /usr/bin/python3.10
This ensures that Ansible uses the correct Python version when connecting to remote hosts.
Step 8: Test Your Ansible Installation
Before relying on your upgraded Ansible for production work, test it thoroughly:
# Check Ansible version
ansible --version

# Run a simple ping test
ansible localhost -m ping

# Run a simple playbook
ansible-playbook test-playbook.yml
Troubleshooting Common Issues
Python Module Import Errors
If you encounter module import errors, ensure that all required dependencies are installed for the new Python version:
sudo python3.10 -m pip install paramiko jinja2 pyyaml cryptography
Path Issues
If running ansible command doesn't use the new version, check your PATH environment variable:
echo $PATH
which ansible
You might need to create symlinks or adjust your PATH to ensure the correct version is used.
Collection Compatibility
Some collections may not be compatible with the new Ansible or Python version. Check the documentation for your specific collections.
Conclusion
Upgrading Ansible when a new Python version is required involves several careful steps to ensure all components work together smoothly. By following this guide, you should be able to successfully upgrade your Ansible installation while minimizing disruption to your automation workflows.
Remember to always test in a non-production environment first, and maintain backups of your configuration and playbooks before making significant changes.
Happy automating!

Leveraging GitHub Actions for Efficient Infrastructure Automation with Separate Workflows.
Building infrastructure requires a well-defined pipeline. This article demonstrates how to leverage GitHub Actions to build an Amazon Machine Image (AMI) with Packer and then automatically trigger a separate Terraform workflow via Github’s Workflow API and pass the AMI ID as well.
Benefits:
- Streamlined workflow: Packer builds the AMI, and the AMI ID is seamlessly passed to the Terraform workflow for deployment.
- Reduced manual intervention: The entire process is automated, eliminating the need to manually trigger the Terraform workflow or update the AMI ID.
- Improved efficiency: Faster deployment cycles and reduced risk of errors due to manual configuration.
Why separate workflows?

First, think about a simple AWS architecture consisting on a Load Balancer in front of an Autoscaling group, you still need to build a VM image, make sure the load balancer has 2 networks for HA and add security groups for layer 4 access controls. The VM will be built by packer and terraform will deploy the rest of the components so your workflow consists of 2 jobs Packer builds, Terraform deploys but I am here to challenge this approach. You might think this goes against Build / Deploy workflows since most workflows or pipelines have the 2 job pattern of packer build then Terraform deploys but often times we see that we need to separate them because the work we do in Terraform is separate and shouldn’t depend on building an AMI every time.
Think of updating the number of machines on the scale set. Doing it manually will cause drift and the typical workflow will need to run packer before getting to Terraform which is not too bad but we are wasting some cycles.
Separating the workflows makes more sense because you can run terraform to update your infrastructure components from any API Client. Having Terraform in a separate workflow gets rid of the dependency of running packer every time. Ultimately, the choice between the two methods depends on your specific requirements and preferences.
Build and Trigger the Next Workflow
In the packer workflow we add a second job to trigger terraform. We have to pass our Personal Access Token (PAT) and the AMI_ID so that terraform can update the VM Autoscaling Group.
trigger_another_repo:

needs: packer

runs-on: ubuntu-latest

steps:

- name: Trigger second workflow

env:

AMITF: ${{ needs.packer.outputs.AMI_ID_TF }}

run: |

curl -X POST \

-H "Authorization: token ${{ secrets.PAT }}" \

-H "Accept: application/vnd.github.everest-preview+json" \

"https://api.github.com/repos/repo_name/workflow_name/dispatches" \

-d '{"event_type": "trigger_tf_build", "client_payload": {"variable_name": "${{ needs.packer.outputs.AMI_ID_TF }}"}}'
As you can see we are simply using CURL to send the data payload to the Terraform workflow.
The Triggered Workflow Requirements
For the Terraform workflow to start from the packer trigger we need a few simple things.
- Workflow trigger
on:

repository_dispatch:

types: [trigger_prod_tf_build]
- Confirm variable (Optional)
- name: Print Event Payload

run: echo "${{ github.event.client_payload.variable_name }}"
While combining Packer and Terraform into a single workflow can simplify things in certain scenarios, separating them provides more granular control, reusability, and scalability. The best approach depends on the specific needs and complexity of your infrastructure.

Containers for Data Scientists on top of Azure Container Apps
The Azure Data Science VMs are good for dev and testing and even though you could use a virtual machine scale set, that is a heavy and costly solution.
When thinking about scaling, one good solution is to containerize the Anaconda / Python virtual environments and deploy them to Azure Kubernetes Service or better yet, Azure Container Apps, the new abstraction layer for Kubernetes that Azure provides.
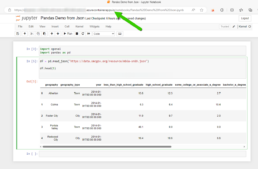
Here is a quick way to create a container with Miniconda 3, Pandas and Jupyter Notebooks to interface with the environment. Here I also show how to deploy this single test container it to Azure Container Apps.
The result:
A Jupyter Notebook with Pandas Running on Azure Container Apps.
Container Build
If you know the libraries you need then it would make sense to start with the lightest base image which is Miniconda3, you can also deploy the Anaconda3 container but that one might have libraries you might never use that might create unnecessary vulnerabilities top remediate.
Miniconda 3: https://hub.docker.com/r/continuumio/miniconda3
Anaconda 3: https://hub.docker.com/r/continuumio/anaconda3
Below is a simple dockerfile to build a container with pandas, openAi and tensorflow libraries.
FROM continuumio/miniconda3
RUN conda install jupyter -y --quiet && \ mkdir -p /opt/notebooks
WORKDIR /opt/notebooks
RUN pip install pandas
RUN pip install openAI
RUN pip install tensorflow
CMD ["jupyter", "notebook", "--ip='*'", "--port=8888", "--no-browser", "--allow-root"]
Build and Push the Container
Now that you have the container built push it to your registry and deploy it on Azure Container Apps. I use Azure DevOps to get the job done.
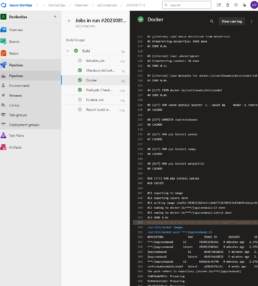
Here’s the pipeline task:
- task: Docker@2

inputs:

containerRegistry: 'dockerRepo'

repository: 'm05tr0/jupycondaoai'

command: 'buildAndPush'

Dockerfile: 'dockerfile'

tags: |

$(Build.BuildId)

latest
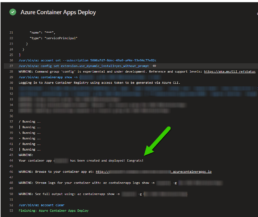
Deploy to Azure ContainerApps
Deploying to Azure Container Apps was painless, after understanding the Azure DevOps task, since I can include my ingress configuration in the same step as the container. The only requirement I had to do was configure DNS in my environment. The DevOps task is well documented as well but here’s a link to their official docs.
Architecture / DNS: https://learn.microsoft.com/en-us/azure/container-apps/networking?tabs=azure-cli
Azure Container Apps Deploy Task : https://github.com/microsoft/azure-pipelines-tasks/blob/master/Tasks/AzureContainerAppsV1/README.md
A few things I’d like to point out is that you don’t have to provide a username and password for the container registry the task gets a token from az login. The resource group has to be the one where the Azure Container Apps environment lives, if not a new one will be created. The target port is where the container listens on, see the container build and the jupyter notebooks are pointing to port 8888. If you are using the Container Apps Environment with a private VNET, setting the ingress to external means that the VNET can get to it not outside traffic from the internet. Lastly I disable telemetry to stop reporting.
task: AzureContainerApps@1

inputs:

azureSubscription: 'IngDevOps(XXXXXXXXXXXXXXXXXXXX)'

acrName: 'idocr'

dockerfilePath: 'dockerfile'

imageToBuild: 'idocr.azurecr.io/m05tr0/jupycondaoai'

imageToDeploy: 'idocr.azurecr.io/m05tr0/jupycondaoai'

containerAppName: 'datasci'

resourceGroup: 'IDO-DataScience-Containers'

containerAppEnvironment: 'idoazconapps'

targetPort: '8888'

location: 'East US'

ingress: 'external'

disableTelemetry: true
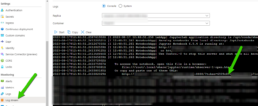
After deployment I had to get the token which was easy with the Log Stream feature under Monitoring. For a deployment of multiple Jupyter Notebooks it makes sense to use JupyterHub.
Deploy Azure Container Apps with the native AzureRM Terraform provider, no more AzAPI!
Azure has given us great platforms to run containers. Starting with Azure Container Instance where you can run a small container group just like a docker server and also Azure Kubernetes Service where you can run and manage Kubernetes clusters and containers at scale. Now, the latest Kubernetes abstraction from Azure is called Container Apps!
When a service comes out in a cloud provider their tools are updated right away so when Contrainer Apps came out you could deploy it with ARM or Bicep. You could still deploy it with Terraform by using the AzAPI provider which interacts directly with Azures API but as of a few weeks back (from the publish date of this article) you can use the native AzureRM provider to deploy it.
Code Snippet
resource "azurerm_container_app_environment" "example" {
  name                       = "Example-Environment"
  location                   = azurerm_resource_group.example.location
  resource_group_name        = azurerm_resource_group.example.name
  log_analytics_workspace_id = azurerm_log_analytics_workspace.example.id
}
resource "azurerm_container_app" "example" {
  name                         = "example-app"
  container_app_environment_id = azurerm_container_app_environment.example.id
  resource_group_name          = azurerm_resource_group.example.name
  revision_mode                = "Single"

  template {
    container {
      name   = "examplecontainerapp"
      image  = "mcr.microsoft.com/azuredocs/containerapps-helloworld:latest"
      cpu    = 0.25
      memory = "0.5Gi"
    }
  }
}
Sources
Self-hosted Postgresql crashed and no backup! How to restore you DB from raw files?
![]()
Here's a great story on why it's good to automate builds, backups and restores, I had the privilege of working on an issue that spelled trouble from the beginning. A long long time ago there was a POC and lots of hype around the product so this POC, which was done manually, turned into PROD. Couple months later the single container running the postgres database crashes and there was no backup. Luckily the container was running in kubernetes and it had a persistent volume with the pgdata directory in it. The container crashed and was not able to come back because of an upgrade done to the DB so the MOST IMPORTANT thing you can do here is to protect the raw files by copying them into another directory. In a previous issue I worked on I have seen deployments that even when you use the existing claim they can wipe the data in it and start fresh, so backup the files you have into a compressed folder and create another copy to restore, this way you can at least have a working base.

Using Bitwarden as a secret source and Powershell vault to keep secrets hidden! - Part 1: Retrieving Secrets
SHHHH! It's a secret! If you are using Bitwarden to store your secrets you are awesome since I am doing the same as it is my favorite vault for personal use. My main use case is for the browser plugin but with the CLI I've been using it in my powershell and python scripts. In this article I will cover a function I created to retrieve secrets from Bitwarden and pass them in Powershell.
In upcoming articles I will show how to use it in Python, Azure DevOps or Jenkins depending on demand for increased security and automation.

Don't be a part of the naughty list of the internet exposed Kubernetes clusters!
A finding by the Shadow Foundation uncovered close to half a million k8s endpoints on the internet which can be targets to exploits. One factor is that by default these clusters are built with public IPs since cloud providers are outside your network and not all companies can have ExpressRoutes or dedicated point to point connectivity. To increase the security and have easier routing of your kubernetes cluster you can create a private cluster. In Azure Kubernetes Service the private cluster assigns an internal IP to your k8s API but NGINX defaults to external IP so in this article I walk through configuring NGINX to have internal IPs as well to keep it all inside the network.
Self-Healing I.T. Orchestration with Jenkins, Powershell, ServiceNow and Azure DevOps!

Most I.T. ticketing systems have an incident module to wait for users to submit issues so that the team can triage and react to solve the issue. In some cases you can spot repetitive issues and automate a fix or workaround to, at least, proactively bring services back online faster than waiting for an user to get an issue and then report the incident. Another benefit on automating fixes or work arounds is that they work 24/7 and they respond faster then the on call person. In this article I will show how to use Jenkins, Powershell, ServiceNow and Azure DevOps to orchestrate a server reboot after detecting a specific issue in the event log of a Windows server.

Deploy Carbon Black linux sensor to your endpoints with a simple Ansible playbook.
You can bake some things into your gold images and/or deploy after the servers are up. Unlike other AVs, Carbon Black makes it easy to do both but in this article we will talk about deploying it after the ubuntu server is up with Ansible.
There are 2 requirements to this playbook. First get the company code from your Carbon Black console. Second, download the sensor from the Carbon Black console ahead of time to to avoid sign-in or MFA. I have 2 examples here where you can download it to the local ansible agent and copy it to the remote server or you can download from Azure storage blob.
The ansible playbook is simple but I added some conditions to make it idempotent.
Checks if CB is already installed

Create directories to place the compressed and uncompressed files.

Downloads installer from Blob to target (If not present)
Uncompress Tarball on Remote Target

Install with Company Code


Avoid Self-Monitoring on your PROD ElasticSearch Cluster! Ship logs to a separate deployment.

It is highly recommended to disable self-monitoring on your production Elasticsearch deployment for performance and built-in support in Elastic Cloud on Kubernetes. In this article we go over configuring the monitoring cluster.