
Comprehensive Guide to Upgrading Ansible via Pip with New Python Versions on Ubuntu 20.04
For system administrators and DevOps engineers using Ansible in production environments, upgrading Ansible can sometimes be challenging, especially when the new version requires a newer Python version than what's available by default in Ubuntu 20.04. This guide walks through the process of upgrading Ansible installed via pip when a new Python version is required.
Why This Matters
Ubuntu 20.04 LTS ships with Python 3.8 by default. However, newer Ansible versions may require Python 3.9, 3.10, or even newer. Since Ansible in our environment is installed via pip rather than the APT package manager, we need a careful approach to manage this transition without breaking existing automation.
Prerequisites
- Ubuntu 20.04 LTS system
- Sudo access
- Existing Ansible installation via pip
- Backup of your Ansible playbooks and configuration files
Step 1: Install the Python Repository "Snakes"
The "deadsnakes" PPA provides newer Python versions for Ubuntu. This repository allows us to install Python versions that aren't available in the standard Ubuntu repositories.
# Add the deadsnakes PPA
sudo add-apt-repository ppa:deadsnakes/ppa

# Update package lists
sudo apt update
Step 2: Install the New Python Version and Pip
Install the specific Python version required by your target Ansible version. In this example, we'll use Python 3.10, but adjust as needed.
# Install Python 3.10 and development headers
sudo apt install python3.10 python3.10-dev python3.10-venv

# Install pip for Python 3.10
curl -sS https://bootstrap.pypa.io/get-pip.py | sudo python3.10

# Verify the installation
python3.10 --version
python3.10 -m pip --version
Note: After this step, you will have different Python versions installed, and you will need to use them with the correct executable as shown above (e.g.,
python3.10for Python 3.10,python3.8for the default Ubuntu 20.04 Python).
Warning: Do not uninstall the Python version that comes with the OS (Python 3.8 in Ubuntu 20.04), as this can cause serious issues with the Ubuntu system. Many system utilities depend on this specific Python version.
Step 3: Uninstall Ansible from the Previous Python Version
Before installing the new version, remove the old Ansible installation to avoid conflicts.
# Find out which pip currently has Ansible installed
which ansible
# This will show something like /usr/local/bin/ansible or ~/.local/bin/ansible

# Check which Python version is used for the current Ansible
ansible --version
# Look for the "python version" line in the output

# Uninstall Ansible from the previous Python version
python3.8 -m pip uninstall ansible ansible-core

# If you had other Ansible-related packages, uninstall those too
python3.8 -m pip uninstall ansible-runner ansible-builder
Step 4: Install Ansible with the New Python Version
Install Ansible for both system-wide (sudo) and user-specific contexts as needed:
System-Wide Installation (sudo)
# Install Ansible system-wide with the new Python version
sudo python3.10 -m pip install ansible

# Verify the installation
ansible --version
# Confirm it shows the new Python version
User-Specific Installation (if needed)
# Install Ansible for your user with the new Python version
python3.10 -m pip install --user ansible

# Verify the installation
ansible --version
Reinstall Additional Pip Packages with the New Python Version
If you had additional pip packages installed for Ansible, reinstall them with the --force-reinstall flag to ensure they use the new Python version:
# Reinstall packages with the new Python version
sudo python3.10 -m pip install --force-reinstall ansible-runner ansible-builder

# For user-specific installations
python3.10 -m pip install --user --force-reinstall ansible-runner ansible-builder
Step 5: Update Ansible Collections
Ansible collections might need to be updated to work with the new Ansible version:
# List currently installed collections
ansible-galaxy collection list

# Update all collections
ansible-galaxy collection install --upgrade --force-with-deps <collection_name>

# Example:
# ansible-galaxy collection install --upgrade --force-with-deps community.general
# ansible-galaxy collection install --upgrade --force-with-deps ansible.posix
Installing Collection Requirements
When installing pip package requirements for Ansible collections, you must use the specific Python executable with the correct version. For example:
# Incorrect (might use the wrong Python version):
sudo pip install -r ~/.ansible/collections/ansible_collections/community/vmware/requirements.txt

# Correct (explicitly using Python 3.11):
sudo python3.11 -m pip install -r ~/.ansible/collections/ansible_collections/community/vmware/requirements.txt
This ensures that the dependencies are installed for the correct Python interpreter that Ansible is using.
Consider using a requirements.yml file to manage your collections:
# requirements.yml
collections:
  - name: community.general
    version: 5.0.0
  - name: ansible.posix
    version: 1.4.0
And install them with:
ansible-galaxy collection install -r requirements.yml
Step 6: Update Jenkins Configuration (If Applicable)
If you're using Jenkins to run Ansible playbooks, you'll need to update your Jenkins configuration to use the new Python and Ansible paths:
- Go to Jenkins > Manage Jenkins > Global Tool Configuration
- Update the Ansible installation path to point to the new version:
- For system-wide installations:
/usr/local/bin/ansible(likely unchanged, but verify) - For user-specific installations: Update to the correct path
- For system-wide installations:
- In your Jenkins pipeline or job configuration, specify the Python interpreter path if needed:
// Jenkinsfile example
pipeline {
    agent any
    environment {
        ANSIBLE_PYTHON_INTERPRETER = '/usr/bin/python3.10'
    }
    stages {
        stage('Run Ansible') {
            steps {
                sh 'ansible-playbook -i inventory playbook.yml'
            }
        }
    }
}
Step 7: Update Ansible Configuration Files (Additional Step)
You might need to update your ansible.cfg file to specify the new Python interpreter:
# In ansible.cfg
[defaults]
interpreter_python = /usr/bin/python3.10
This ensures that Ansible uses the correct Python version when connecting to remote hosts.
Step 8: Test Your Ansible Installation
Before relying on your upgraded Ansible for production work, test it thoroughly:
# Check Ansible version
ansible --version

# Run a simple ping test
ansible localhost -m ping

# Run a simple playbook
ansible-playbook test-playbook.yml
Troubleshooting Common Issues
Python Module Import Errors
If you encounter module import errors, ensure that all required dependencies are installed for the new Python version:
sudo python3.10 -m pip install paramiko jinja2 pyyaml cryptography
Path Issues
If running ansible command doesn't use the new version, check your PATH environment variable:
echo $PATH
which ansible
You might need to create symlinks or adjust your PATH to ensure the correct version is used.
Collection Compatibility
Some collections may not be compatible with the new Ansible or Python version. Check the documentation for your specific collections.
Conclusion
Upgrading Ansible when a new Python version is required involves several careful steps to ensure all components work together smoothly. By following this guide, you should be able to successfully upgrade your Ansible installation while minimizing disruption to your automation workflows.
Remember to always test in a non-production environment first, and maintain backups of your configuration and playbooks before making significant changes.
Happy automating!

Develop and Test Local Azure Functions from your IDE
Offloading code from apps is a great way to adapt a microservices architecture. If you are still making the decision of whether to create functions or just code on your app, check out the decision matrix article and some gotchas that will help you know if you should create a function or not. Since we have checked the boxes and our code is a great candidate for Azure Functions then here’s our process:
Dev Environment Setup
Azure Functions Core Tools
First thing is to install the Azure Functions core tools on your machine. There are many ways to install the core tools and instructions can be found in the official Microsoft learn doc here: Develop Azure Functions locally using Core Tools | Microsoft Learn . We are using Ubuntu and Python so we did the following:
wget -q https://packages.microsoft.com/config/ubuntu/22.04/packages-microsoft-prod.deb

sudo dpkg -i packages-microsoft-prod.deb
Then:
sudo apt-get update

sudo apt-get install azure-functions-core-tools-4
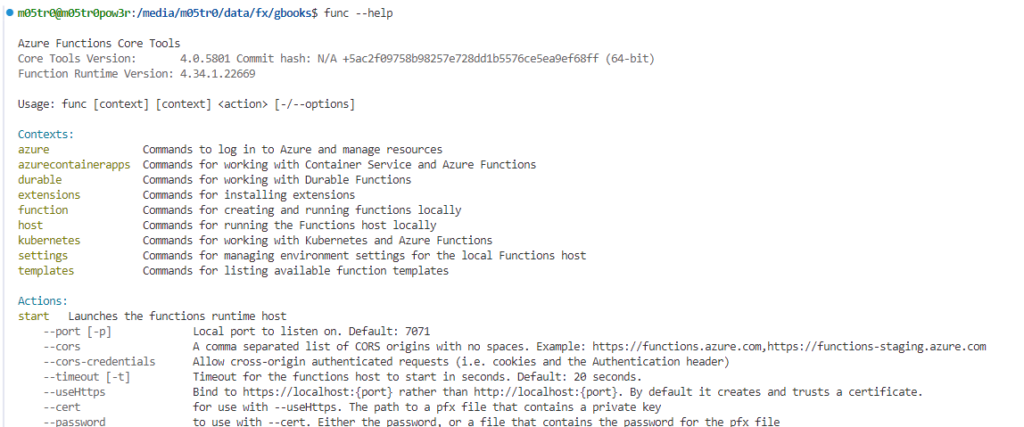
After getting the core tools you can test by running
func --help
Result:
Visual Studio Code Extension
- Go to the Extensions view by clicking the Extensions icon in the Activity Bar.
- Search for “Azure Functions” and install the extension.
- Open the Command Palette (F1) and select
Azure Functions: Install or Update Azure Functions Core Tools.
Azure Function Fundamentals
Here are some Azure Function Basics. You can write in many languages as described in the official Microsoft learn doc here: Supported Languages with Durable Functions Overview – Azure | Microsoft Learn . We are using Python so here’s our process
I. Create a Python Virtual Environment to manage dependencies:
A Python virtual environment is an isolated environment that allows you to manage dependencies for your project separately from other projects. Here are the key benefits:
- Dependency Isolation:
- Each project can have its own dependencies, regardless of what dependencies other projects have. This prevents conflicts between different versions of packages used in different projects.
- Reproducibility:
- By isolating dependencies, you ensure that your project runs consistently across different environments (development, testing, production). This makes it easier to reproduce bugs and issues.
- Simplified Dependency Management:
- You can easily manage and update dependencies for a specific project without affecting other projects. This is particularly useful when working on multiple projects simultaneously.
- Cleaner Development Environment:
- Your global Python environment remains clean and uncluttered, as all project-specific dependencies are contained within the virtual environment.
Create the virtual environment simply with: python -m venv name_of_venv
What is a Function Route?
A function route is essentially the path part of the URL that maps to your function. When an HTTP request matches this route, the function is executed. Routes are particularly useful for organizing and structuring your API endpoints.
II. Initialization
The line app = func.FunctionApp() seen in the code snippet below is used in the context of Azure Functions for Python to create an instance of the FunctionApp class. This instance, app, serves as the main entry point for defining and managing your Azure Functions within the application. Here’s a breakdown of what it does:
- Initialization:
- It initializes a new
FunctionAppobject, which acts as a container for your function definitions.
- It initializes a new
- Function Registration:
- You use this
appinstance to register your individual functions. Each function is associated with a specific trigger (e.g., HTTP, Timer) and is defined using decorators.
- You use this
import azure.functions as func

app = func.FunctionApp()

@app.function_name(name="HttpTrigger1")

@app.route(route="hello")

def hello_function(req: func.HttpRequest) -> func.HttpResponse:

name = req.params.get('name')

if not name:

try:

req_body = req.get_json()

except ValueError:

pass

else:

name = req_body.get('name')

if name:

return func.HttpResponse(f"Hello, {name}!")

else:

return func.HttpResponse(

"Please pass a name on the query string or in the request body",

status_code=400

)
- The
@app.function_nameand@app.routedecorators are used to define the function’s name and route, respectively. This makes it easy to map HTTP requests to specific functions. - The
hello_functionis defined to handle HTTP requests. It extracts thenameparameter from the query string or request body and returns a greeting. - The function returns an
HttpResponseobject, which is sent back to the client.
What is a Function Route?
A function route is essentially the path part of the URL that maps to your function. When an HTTP request matches this route, the function is executed. Routes are particularly useful for organizing and structuring your API endpoints.
Running The Azure Function
Once you have your code ready to go you can test you function locally by using func start but there are a few “gotchas” to be aware of:
1. Port Conflicts
- By default,
func startruns on port 7071. If this port is already in use by another application, you’ll encounter a conflict. You can specify a different port using the--portoption:func start --port 8080
2. Environment Variables
- Ensure that all necessary environment variables are set correctly. Missing or incorrect environment variables can cause your function to fail. You can use a
local.settings.jsonfile to manage these variables during local development.
3. Dependencies
- Make sure all dependencies listed in your
requirements.txt(for Python) orpackage.json(for Node.js) are installed. Missing dependencies can lead to runtime errors.
4. Function Proxies
- If you’re using function proxies, ensure that the
proxies.jsonfile is correctly configured. Misconfigurations can lead to unexpected behavior or routing issues.
5. Binding Configuration
- Incorrect or incomplete binding configurations in your
function.jsonfile can cause your function to not trigger as expected. Double-check your bindings to ensure they are set up correctly.
6. Local Settings File
- The
local.settings.jsonfile should not be checked into source control as it may contain sensitive information. Ensure this file is listed in your.gitignorefile.
7. Cold Start Delays
- When running functions locally, you might experience delays due to cold starts, especially if your function has many dependencies or complex initialization logic.
8. Logging and Monitoring
- Ensure that logging is properly configured to help debug issues. Use the
func startcommand’s output to monitor logs and diagnose problems.
9. Version Compatibility
- Ensure that the version of Azure Functions Core Tools you are using is compatible with your function runtime version. Incompatibilities can lead to unexpected errors.
10. Network Issues
- If your function relies on external services or APIs, ensure that your local environment has network access to these services. Network issues can cause your function to fail.
11. File Changes
- Be aware that changes to your function code or configuration files may require restarting the
func startprocess to take effect.
12. Debugging
- When debugging, ensure that your IDE is correctly configured to attach to the running function process. Misconfigurations can prevent you from hitting breakpoints.
By keeping these gotchas in mind, you can avoid common pitfalls and ensure a smoother development experience with Azure Functions. If you encounter any specific issues or need further assistance, feel free to ask us!
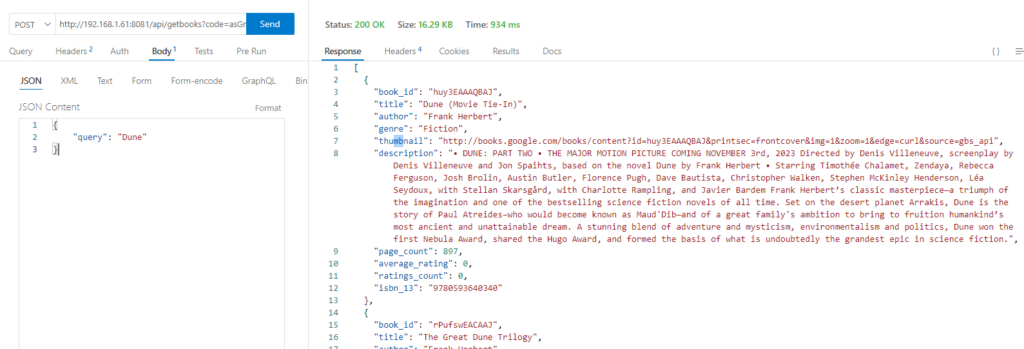
Testing and Getting Results
If your function starts and you are looking at the logs you will see your endpoints listed as seen below but since you wrote them you know the paths as well and can start testing with your favorite API client, our favorite is Thunder Client.
The Response
In Azure Functions, an HTTP response is what your function sends back to the client after processing an HTTP request. Here are the basics:
- Status Code:
- The status code indicates the result of the HTTP request. Common status codes include:
200 OK: The request was successful.400 Bad Request: The request was invalid.404 Not Found: The requested resource was not found.500 Internal Server Error: An error occurred on the server.
- The status code indicates the result of the HTTP request. Common status codes include:
- Headers:
- HTTP headers provide additional information about the response. Common headers include:
Content-Type: Specifies the media type of the response (e.g.,application/json,text/html).Content-Length: Indicates the size of the response body.Access-Control-Allow-Origin: Controls which origins are allowed to access the resource.
- HTTP headers provide additional information about the response. Common headers include:
- Body:
- The body contains the actual data being sent back to the client. This can be in various formats such as JSON, HTML, XML, or plain text. We chose JSON so we can use the different fields and values.
Conclusion
In this article, we’ve explored the process of creating your first Python Azure Function using Visual Studio Code. We covered setting up your environment, including installing Azure Functions Core Tools and the VS Code extension, which simplifies project setup, development, and deployment. We delved into the importance of using a Python virtual environment and a requirements.txt file for managing dependencies, ensuring consistency, and facilitating collaboration. Additionally, we discussed the basics of function routes and HTTP responses, highlighting how to define routes and customize responses to enhance your API’s structure and usability. By understanding these fundamentals, you can efficiently develop, test, and deploy serverless applications on Azure, leveraging the full potential of Azure Functions. Happy coding!